edeyglezsosa 3Speak Podcast

edeyglezsosa 3Speak Podcast

By Edey González Sosa
Download on the App Store

edeyglezsosa 3Speak Podcast episodes

  • DIY: Spiderman 3D made of fomi [ENG+ESP]
    https://3speak.tv/watch?v=edeyglezsosa/guibgxul
    ![Red and Black Childish Birthday Virtual Invitation.png](https://files.peakd.com/file/peakd-hive/edeyglezsosa/23wzzqAzo5b8ThSX824PHe5LbouDC6rc8TUza94wNEPNwsBAKL9ws2oqoaRbtXvuDMhc3.png)
    Greetings, dear friends of the community. This time I come to show you a videotutorial in which I show you step by step how I made a craft that is very, very out of my comfort zone as far as working with fomi is concerned. And yes, this is my first time making a fofusho. While the procedure to make this 3D Spider-Man is very easy, I must say that I still need to practice a lot and take an anatomy class 😅.
    For the realization of this craft I used red and blue fomi, which are the characteristic colors of the costume of this superhero. The internal structure is composed of plastic balls of different sizes and I drew the lines of the suit with permanent marker. I hope you like it and I encourage you to make one by yourselves, let's start with the tutorial.
    >>Saludos, queridos amigos de la comunidad. En esta ocasión vengo a mostrarles un videotutorial en el cual muestro cómo paso a paso realicé una manualidad que está muy, pero muy fuera de mi zona de confort en cuanto al trabajo con fomi se refiere. Y sí, esta es mi primera vez haciendo un fofucho. Si bien el procedimiento para hacer este Spider-Man 3D es muy fácil, debo decir que aún me hace falta practicar un montón y tomar una que otra clase de anatomía 😅.
    >
    >>Para la realización de esta manualidad empleé fomi rojo y azul, los cuales son los colores característicos del traje de este superhéroe. La estructura interna está compuesta por pelotitas de plástico de diferente tamaño y el trazado de las líneas del traje las hice con marcador permanente. Espero que les guste y se animen a hacer alguno por ustedes mismos, comencemos con el tutorial.
    ![Snapshot_232.PNG](https://files.peakd.com/file/peakd-hive/edeyglezsosa/23x176YZvLArAkUVBXfFxQNenF3U5uY9jpfT6fRZjH3juNRit4q9MQisUcxPcXL1uBFfG.PNG)
    ## Materials // Materiales
    English
    Español
    ✔️ Red, blue and white fomi
    ✔️ Fomi rojo, azul y blanco
    ✔️ Plastic Balls
    ✔️ Pelotas de plástico
    ✔️ Cutting and carving tools
    ✔️ Herramientas de corte y tallado
    ✔️ Scissors
    ✔️ Tijeras
    ✔️ Pencil and marker
    ✔️ Lápiz y marcador
    ✔️ Silicone gun
    ✔️ Pistola de silicona
    ![20240624_170207.jpg](https://files.peakd.com/file/peakd-hive/edeyglezsosa/23wqcMwcz5YvVT6BVj3gXvgJHCxeLu1ng5DpKJ8m6xzYAZRvJepjTXg6DwA737CDkySKX.jpg)
    ## Step by step // Paso a paso
    1️⃣ To start, the first thing I did was to cut out two square pieces of red fomi to heat with a hair iron and thermoform around the larger plastic ball. After thermoforming, trim the excess fomi until you have two sides of red fomi that will cover the ball completely.
    In the case of the blue fomi, I repeated the same process, only in this case I used the smaller plastic ball.
    >>1️⃣ *Para empezar, lo primero que hice fue recortar dos piezas cuadradas de fomi rojo para calentarlas con una plancha de pelo y termo formarlas alrededor de la pelota de plástico más grande. Luego de termoformado, recorte el fomi excedente hasta tener dos caras de fomi rojo que cubrirán la pelota por completo.*
    >
    >>*En el caso del fomi azul, repetí el mismo proceso, solo que en este caso utilicé la pelota de plástico más pequeña.*
    https://images.hive.blog/0x0/https://files.peakd.com/file/peakd-hive/edeyglezsosa/23wMcszC4C2H8kwXkjdAEeA43iTpRbJsSXCmbZwz7txvPKUzfjMfFkpuSrrB6RFeKB4fD.PNG
    https://images.hive.blog/0x0/https://files.peakd.com/file/peakd-hive/edeyglezsosa/23u67FtYxp1odJ9zBwWP66n5Ns4nB4rVD7tTi8wJSnVkpzEdG9fbUyHB7SFavidzWfmFj.PNG
    https://images.hive.blog/0x0/https://files.peakd.com/file/peakd-hive/edeyglezsosa/23wCC4qPgqy5uZeLHQNNTAPGYYX9eEnbyJJPNY4dsSiJfx35zHX8N5juXiJ6udXX6Joec.PNG
    https://images.hive.blog/0x0/https://files.peakd.com/file/peakd-hive/edeyglezsosa/23x1DAxeq5TTMjMYm3NKKaAmDeN1dLtHV3N6aEVorGPgVmmjKmNCJD9JTRLLJ4gzNCvym.PNG
    https://images.hive.blog/0x0/https://files.peakd.com/file/peakd-hive/edeyglezsosa/23tmN1HyHZ454D6aL2H9YCW5WQCVk7WBBcAvXTzvsXs3nEAiqec8jQp7J1BKwTRcErSQf.PNG
    https://images.hive.blog/0x0/https://files.peakd.com/file/peakd-hive/edeyglezsosa/23wWvfY6LCDyYR3kKk1jfkuJGdRyKEf3vzctGY2qWxspLzAsTnvW6TxkDscvFfJquaR1n.PNG
    https://images.hive.blog/0x0/https://files.peakd.com/file/peakd-hive/edeyglezsosa/23uFTcnXkPw9PKc1GjJiqxsooqn4USNWD9v1uF7fzyfjPNNNnvPbipkayhSSP7HVuZSvW.PNG
    2️⃣ I glued each of the thermoformed fomi pieces around its respective plastic ball and then glued the balls together. Using a piece of red fomi, I made a breastplate for the costume and after gluing it in place, I used a marker to draw each of the stripes of the costume's spider web.
    >>2️⃣ *Cada una de las piezas de fomi termoformado las pegué alrededor de su respectiva pelotita plástica y luego pegué las pelotitas entre sí. Utilizando un retazo de fomi rojo, hice una pechera para el traje y luego de pegarla en su lugar, utilicé un marcador para dibujar cada una de las rayas de la telaraña del traje.*
    https://images.hive.blog/0x0/https://files.peakd.com/file/peakd-hive/edeyglezsosa/23vi3wc9ctrewqs1Xitc3u1NAS3ni88qT66wBHYBTBnWd9ANLYUdPhekobvYcpnARhyvu.PNG
    https://images.hive.blog/0x0/https://files.peakd.com/file/peakd-hive/edeyglezsosa/23uQtezBuZA49Kf7QKr1BDpa7P8fmqQnKPsHPFVEcME4a2UEkXEdz85KYsqozscJumKUC.PNG
    https://images.hive.blog/0x0/https://files.peakd.com/file/peakd-hive/edeyglezsosa/23vi1wxphox2Ni7kXXExx5ju9Ap5s5U66NtUTeuf9ZWrRzcD1kYTxGdHChcXG8omDAKTe.PNG
    https://images.hive.blog/0x0/https://files.peakd.com/file/peakd-hive/edeyglezsosa/23tmKwDqSG3CSfC2sX6EcL8bEe2FJRViV5LSEiazyqpcgttUVir9533SSkK1Pxbe3Vpmn.PNG
    3️⃣ Next, I rolled small rectangles of blue fomi to form the hands and legs. At the end of each of the limbs, I rolled a small strip of red fomi to create the gloves and boots. Next, I drew and cut out the silhouette of the hands and feet in red fomi, which I glued to the end of each of the limbs.
    >>3️⃣ *A continuación, enrollé pequeños rectángulos de fomi azul para formar las manos y piernas. En el extremo de cada una de las extremidades enrollé una pequeña tira de fomi rojo para crear los guantes y botas. Seguidamente, en fomi rojo, dibujé y recorté la silueta de las manos y los pies, los cuales pegué en el extremo de cada una de las extremidades.*
    https://images.hive.blog/0x0/https://files.peakd.com/file/peakd-hive/edeyglezsosa/23u67LHjzr7PmNwHBNqxYfjkRVR2VSmHAb7e4TWv72Yoo5nokgux1g8RFjGJMhFcSfSm7.PNG
    https://images.hive.blog/0x0/https://files.peakd.com/file/peakd-hive/edeyglezsosa/23uFXv1ASnUunGBADXZdVCC9NAPnCBLBCh3DNwx339QJXkKqdQCorZcGeUUVjj3QSCbAz.PNG
    https://images.hive.blog/0x0/https://files.peakd.com/file/peakd-hive/edeyglezsosa/23tvitQtKQ5x9Q9vmHckDinQZ5wgx5qvVtyyNgEixHFWRp3BQ1GT856HyE3FXLguGei5M.PNG
    https://images.hive.blog/0x0/https://files.peakd.com/file/peakd-hive/edeyglezsosa/23w2oQTUzYaQRKLfuDk7zXUKZRXarLcLJyCv466wvf3pn5Gbs6uoMQy1uEqLL4abfyQbb.PNG
    https://images.hive.blog/0x0/https://files.peakd.com/file/peakd-hive/edeyglezsosa/23zkrRNHedSn2gyiY5YwY8zTaqYiFyxEQCJwH2tQtAtBfntoZJ6jqdSQPWpUBzY1rvN3t.PNG
    4️⃣ Once the limbs were created, I attached them to the body. In the case of the feet, I placed them in semi-flexed position, since Spider-Man will not be standing, and for the hands it was necessary to make some small transversal cuts that allowed to place them correctly next to the torso.
    >>4️⃣ *Una vez creadas las extremidades, las uní al cuerpo. En el caso de los pies, los coloqué en posición de semi-flexión, ya que Spider-Man no estará de pie, y para las manos fue necesario hacer unos pequeños cortes transversales que permitieron ubicarlas correctamente al lado del torso.*
    https://images.hive.blog/0x0/https://files.peakd.com/file/peakd-hive/edeyglezsosa/23u69L2n6SX86moFTzFSpVZeqbL7KUnqZjS7zkXxmuNbLYxNsPe6PXvsLwFsiaUSJ7J9W.PNG
    https://images.hive.blog/0x0/https://files.peakd.com/file/peakd-hive/edeyglezsosa/23tbwUnaS2LLvkC5CfFUpahbqbsFjBsqntpyBzwvsvxJJRC7EJ7rrKBUv9YFS6hAE95Bs.PNG
    https://images.hive.blog/0x0/https://files.peakd.com/file/peakd-hive/edeyglezsosa/23vsSyLvoK5SVDB7ppUTq45tCuscwHzbizfuiLRkHnJqhezZNZHLFMJrPFrMHvP4s6dej.PNG
    5️⃣ To finish, I drew the missing lines of the suit on the hands and feet. Also, in white fomi, I drew the eyes of the mask, which I attached to the suit after cutting them out. Finally, I placed the whole piece on top of a pencil cap, placing it in an action position.
    >>5️⃣ *Para finalizar, dibujé las líneas del traje faltantes en las manos y pies. También, en fomi blanco, dibujé los ojos de la máscara, los cuales adherí al traje luego de recortarlos. Por último, coloqué toda la pieza encima del casquillo de un lápiz, ubicándolo en una posición de acción.*
    https://images.hive.blog/0x0/https://files.peakd.com/file/peakd-hive/edeyglezsosa/23u67BBX5M8aMdMo76Rn8TkKvQzJhnoxRUbfZVkfbBXwqtnnBz21H2LMyGDbnTRcdctR3.PNG
    https://images.hive.blog/0x0/https://files.peakd.com/file/peakd-hive/edeyglezsosa/23vhyoe6HWMjdT9yZ7f1UEc6V6x4Bc1HXDVL2hd8Cz5eCNKtPXs4JUZB297MAmxKBUxab.PNG
    https://images.hive.blog/0x0/https://files.peakd.com/file/peakd-hive/edeyglezsosa/23uQtnmkkcqJgkGdCqFFdNAS3T7V3eFtPzbwuvqsWUnUBC73VbhTimdgkccoDweu77W6V.PNG
    https://images.hive.blog/0x0/https://files.peakd.com/file/peakd-hive/edeyglezsosa/23xp2TcKvAfEWDAud83upUbYr2YTsXthkTMud8E1788SfheP6xvWdkCuX3NarcB6tNUpp.PNG
    And so we come to the end of this tutorial where I showed you how, through a few simple steps, we can create a Spider-Man puppet using fomi. I hope you liked it and for now I say goodbye, but not before wishing you a happy day.
    >> *Y así llegamos al final de este tutorial donde les mostré cómo, a través de unos sencillos pasos, podemos crear un fofucho de Spider-Man utilizando fomi. Espero que haya sido de su agrado y por ahora me despido, no sin antes desearles una feliz jornada.*
    ## ⚜️ Result // Resultado ⚜️
    https://images.hive.blog/0x0/https://files.peakd.com/file/peakd-hive/edeyglezsosa/23xVPDXZokvpgSYDZCg8Tx7ttmeynTbAB3kkFxgRPe2hFmJpmMWDmDactTHPsezwHMLNk.jpg
    https://images.hive.blog/0x0/https://files.peakd.com/file/peakd-hive/edeyglezsosa/23wX5ZFzXi5dHH1ePini3uBM8N1efWufqoR8KKvsxd4MQ5mGJ1nKYzLZ14C3Sh8Yj4RRh.jpg
    https://images.hive.blog/0x0/https://files.peakd.com/file/peakd-hive/edeyglezsosa/23wMggJ1qKA2bp42HAQhyhW5UdMpKyHMEjYQ1KhFkHfmCrgGYVf1QS3ovmKvxjTxR9ARG.jpg
    https://images.hive.blog/0x0/https://files.peakd.com/file/peakd-hive/edeyglezsosa/23wX5Uub7U6fEHZx6xqSNCBBnQcahfNM6dzfVAFXZ32eJ3cGnJc8qaeYU636fvhe5KFb7.jpg
    ![2dk2RRM2dZ8gKjXsrozapsD83FxL3Xbyyi5LFttAhrXxr16mCe4arfLHwFmYKkraGFYmHjrWK4gjrnfbYnAEWgiu7haPNvaeCAPaoSvqgV87wSQda4UzpKaAEHTpcJz95U6thCwr6azqBiXRtBeAZZKTgmJcpei7ZhAZjyFv7g.png](https://files.peakd.com/file/peakd-hive/edeyglezsosa/23tRrCsM8uF676cQdqTbrS852E58grkkwobSLvMV8UmdqmnfpWAdw8W5FyUCZhjvEzPts.png)
    `Thank you very much for reading my post. If you liked it, please leave a comment and consider following me so you don't miss my next posts. I'd love to know your opinion and your thoughts about the topic I discussed in this post, see you in the next one! `
    ![2dk2RRM2dZ8gKjXsrozapsD83FxL3Xbyyi5LFttAhrXxr16mCe4arfLHwFmYKkraGFYmHjrWK4gjrnfbYnAEWgiu7haPNvaeCAPaoSvqgV87wSQda4UzpKaAEHTpcJz95U6thCwr6azqBiXRtBeAZZKTgmJcpei7ZhAZjyFv7g.png](https://files.peakd.com/file/peakd-hive/edeyglezsosa/23tRrCsM8uF676cQdqTbrS852E58grkkwobSLvMV8UmdqmnfpWAdw8W5FyUCZhjvEzPts.png)
    ## Credits and Resources // Créditos y Recursos
    Cover page created in [**Canva**](www.canva.com)
    Translated by [**DeepL**](https://www.deepl.com/translator)
    Video and images captured with my **Samsung Galaxy A53**
    Edited in **Wondershare Filmora 13**
    Music by Yurii Semchyshyn from Pixabay
    ![diy comunity banner.gif](https://files.peakd.com/file/peakd-hive/edeyglezsosa/23swXhgKCmFYtzonFjqXoVpivudgtk9kiS2eg2BsQT8cyMiD8vYPmGCgoNYZEPx9WVcLD.gif)
    [![banner witness hive diy.gif](https://files.peakd.com/file/peakd-hive/edeyglezsosa/Eo6MRjg61khD6eTqg7XAaKz45E7eNcQ9zJiK83zZfvj55W5Bnp1jszfFc9oFkM395zQ.gif)
    ](https://vote.hive.uno/@hivediy)
    ![Diseño sin título (2).gif](https://files.peakd.com/file/peakd-hive/edeyglezsosa/EoCiB5ktmvqL6mfMpsb6oH8oaTJnnypEYELWswd5zHy9mGT33MDmbdjJmL8neJ33K99.gif)
    3 min
  • [ENG+ESP] Cocktail "Ananas - Orange"
    https://3speak.tv/watch?v=edeyglezsosa/virmwgsn
    ![Beige & Orange Modern Pineapple Juice Instagram Post.png](https://files.peakd.com/file/peakd-hive/edeyglezsosa/23xyXNWukPUGNzmSjiEZNp4KSeHhdLccuzuFqsYCAogNj5nrRXDNiKrhitUTmJXfxj2sm.png)
    Warm greetings to all the friends of the community. I am pleased to be here once again showing you various cocktail recipes from my country. Today I bring you a video tutorial, in which, step by step, I will be showing you how to make a cocktail called Ananás-Orange. This cocktail, like the others I have presented in the community, belongs to the "Mulata" line of liqueurs and beverages.
    For the preparation of this cocktail I have taken certain creative liberties, so it is important to clarify that it is an interpretation of the original recipe. This recipe can be found on the back of the "Mulata" orange liqueur bottle. Among the modifications I made is the incorporation of Havana Club Añejo Especial Rum instead of the Añejo Rum specified on the bottle.
    >>*Saludos cordiales para todos los amigos de la comunidad. Me complace estar una vez más por aquí mostrándoles variadas recetas de coctelería de mi país. El día de hoy les traigo un videotutorial, en el cual, paso a paso, les estaré mostrando cómo elaborar un cóctel llamado Ananás-Orange. Este cóctel, al igual que los otros que he presentado en la comunidad, pertenece a la línea de licores y bebidas “Mulata”.*
    >
    >>*Para la elaboración de este cóctel me he tomado ciertas libertades creativas, por lo cual, es importante aclarar que es una interpretación de la receta original. Dicha receta puede ser encontrada en el reverso de la botella de licor de naranja “Mulata”. Entre las modificaciones que realicé está la incorporación del Ron Havana Club Añejo Especial en vez del Ron Añejo que se especifica en la botella.*
    https://images.hive.blog/0x0/https://files.peakd.com/file/peakd-hive/edeyglezsosa/23wMRdnyGPBuAyWBGatgymDK3uqscMGDnjw12XuK2mWkJps75q2HRkRwantdj3aYnxExH.PNG
    https://images.hive.blog/0x0/https://files.peakd.com/file/peakd-hive/edeyglezsosa/23ycrwkRdZaEdtogGFSh8ENf7GHxt9xVSxhKGFmd7u2V3uCus9jptqv3RkEVoMUdLkNdX.PNG
    ## Ingredients // Ingredientes
    English
    Español
    ✔️ 8 ml Orange Liqueur "Mulata"
    ✔️ 8 ml Licor de naranja "Mulata"
    ✔️ 45 ml Rum Havana Club Añejo Especial
    ✔️ 45 ml Ron Havana Club Añejo Especial
    ✔️ 60 ml Pineapple juice (ripe)
    ✔️ 60 ml Jugo de piña (madura)
    ![20240619_114548.jpg](https://files.peakd.com/file/peakd-hive/edeyglezsosa/23u5xwW6oSxnpgb5jopB7HvCmo636KFfbGVkV8Qxt5aYhg9VMmVMAhUHi8xJp1PhFftbw.jpg)
    ## Summary of the Tutorial // Resumen del Tutorial
    1️⃣ To start with the preparation, I proceed to peel the pineapple and then cut it into squares. This will allow me to beat it more easily with the help of a hand blender. Afterwards, it is strained to eliminate the solid residues and obtain the juice. It is important to clarify that I used a very ripe pineapple because I wanted its sweetness to contrast with the powerful flavor of the Añejo Especial.
    >>1️⃣ *Para empezar con la elaboración, procedo a pelar la piña para luego cortarla en cuadros. Esto me permitirá batirla con mayor facilidad con ayuda de una batidora de mano. Posteriormente, se cuela para eliminar los residuos sólidos y obtener el jugo. Es importante aclarar que utilicé una piña bien madura porque quería que su dulzor contrastara con el potente sabor del Añejo Especial.*
    https://images.hive.blog/0x0/https://files.peakd.com/file/peakd-hive/edeyglezsosa/23xVEvx7mTB7dp8YCzA8EYD2X1HRfPSvS5wcJRnpCyH1nkroXy37Ri533Pwj2zjubBw2x.PNG
    https://images.hive.blog/0x0/https://files.peakd.com/file/peakd-hive/edeyglezsosa/23x14ndt4hp371oGWs15SZBod8eJmuu4m6wy1XfEkMYry14kBMyzeu8qaPNHjHtXYggPz.PNG
    https://images.hive.blog/0x0/https://files.peakd.com/file/peakd-hive/edeyglezsosa/23wC7vmCRYhFPM5Fvvig8shVPKNBMSBvxtLWYTxuZuN28NHvv4Q2R2VK7TeRo94XEskzV.PNG
    https://images.hive.blog/0x0/https://files.peakd.com/file/peakd-hive/edeyglezsosa/23vsLd3EMcf3nHBJU7xs13HEDQLdbz8a868qAfk7SEU9covJtiXtgurj8iZQLS9AyKRaT.PNG
    https://images.hive.blog/0x0/https://files.peakd.com/file/peakd-hive/edeyglezsosa/23x14ervpdc6FYAXr7qCsCj5cPQpcNBB1hBgA4WUb9fwwXmKtL2BXpUUnvSxHW2Z9XfqD.PNG
    https://images.hive.blog/0x0/https://files.peakd.com/file/peakd-hive/edeyglezsosa/23wWtoTCsTpfjHyyk2fwN9eUvDHzGrtNKhwoa5NnCUhqGpDwLkQL9u3aQ3kc5pta3b48L.PNG
    https://images.hive.blog/0x0/https://files.peakd.com/file/peakd-hive/edeyglezsosa/23vsNB8ciKisnzYkm4wBbRJHwDLMnF6cGKx6gCFvszNw7UDc7xCLGpkRF1yvs4iqDWgyn.PNG
    2️⃣ Once the pineapple juice is ready, we proceed to separate and measure the exact amounts of each ingredient.
    >>2️⃣ *Una vez tengamos listo el jugo de piña, procedemos a separar y medir las cantidades exactas de cada ingrediente.*
    https://images.hive.blog/0x0/https://files.peakd.com/file/peakd-hive/edeyglezsosa/23xAaCL4SLxbePU6diUCQHZHAp9y1JWYUTmRPzPdK29Y4yN57UCxbmzHVbUJfd56ZbNkQ.PNG
    https://images.hive.blog/0x0/https://files.peakd.com/file/peakd-hive/edeyglezsosa/23ycyrPvCun66rPho26TDrG8a53rbqzf5gmEXje1kQvi3QMaAPSy8ppdGrvhkrfUn5r5Q.PNG
    https://images.hive.blog/0x0/https://files.peakd.com/file/peakd-hive/edeyglezsosa/23yJC1BsZyWxymPpeJd9GjLgegCGbMZpQj3BXBcgypSiTzSaVcQrYZZqKjhd2My9XqFPH.PNG
    https://images.hive.blog/0x0/https://files.peakd.com/file/peakd-hive/edeyglezsosa/23xKsyqK5JuvJJZrL9Ehd1JnhnN4wKWhTNDKSVxfi6EVdQjkMAGkk4muc3hSGtaaGVV4P.PNG
    3️⃣ Mix all ingredients in a shaker along with frappé ice. Shake for a while to homogenize the mixture and serve in a glass of water.
    >>3️⃣ *Se mezclan todos los ingredientes en una coctelera junto con hielo frappé. Agitar durante un tiempo para homogeneizar la mezcla y servimos en una copa de agua.*
    https://images.hive.blog/0x0/https://files.peakd.com/file/peakd-hive/edeyglezsosa/23vhz1cTUDuTJADHE383ZJPqJmBznPat4MMNQ1tasfz984m6wvV6ZZ9uyG1krju2yoweT.PNG
    https://images.hive.blog/0x0/https://files.peakd.com/file/peakd-hive/edeyglezsosa/23vsKyxM8akxjLGtvphznLsJVpLHie2UW7YgXogfHs33NandDUdRPbk2f64QRHDifqktX.PNG
    https://images.hive.blog/0x0/https://files.peakd.com/file/peakd-hive/edeyglezsosa/23xp2TbbFzLFsnrKAJvXPBENFQKM7tTNZqrnL6gjhFuvHexFXy1rrgmFHDWaVrHRSdQZD.PNG
    https://images.hive.blog/0x0/https://files.peakd.com/file/peakd-hive/edeyglezsosa/23xebHfqRGvDaaSh7PCZCc3U6RNvakujT6PvteLf7Ljqaontv3P7i8Uox41iXGyUvESuq.PNG
    https://images.hive.blog/0x0/https://files.peakd.com/file/peakd-hive/edeyglezsosa/23ynNRpGTkkt8vLCPqTQFStWJ3nQ46dbb4wgK7keQUHEFfeFVWKyGnbSGUCdxTFfaCoaw.PNG
    https://images.hive.blog/0x0/https://files.peakd.com/file/peakd-hive/edeyglezsosa/23wWpJAtBVjGGnvuUjgiBFEZgfoFqAfwHtfC9inJDoZLyn1peLgAesGQkgsMYpg8Xk7zz.PNG
    4️⃣ Finally, the glass is decorated with a wedge of pineapple and placed on a platter accompanied by some pineapple sticks and the crown itself as decoration.
    >>4️⃣ *Para finalizar, se decora la copa con una cuña de piña y se coloca sobre una fuente acompañada de unos bastoncitos elaborados de piña y la propia corona a modo de decoración.*
    https://images.hive.blog/0x0/https://files.peakd.com/file/peakd-hive/edeyglezsosa/23ynQWRixqRfZfYV1FgN8FEipwyb6nzhA4pPkRu55TXBjofufW25Fp9my8phEmds6U7eq.jpg
    https://images.hive.blog/0x0/https://files.peakd.com/file/peakd-hive/edeyglezsosa/23vhwVh1QYLtG8NT4utEKqAgiDaTCU1cfpBAB15uRfog7cNrGuG6MYPH5tSTp6yjikwjD.PNG
    https://images.hive.blog/0x0/https://files.peakd.com/file/peakd-hive/edeyglezsosa/23xp4QWv1pZUeb2ureizZNAPatY6tqnUokxrhAgkqXu1Errsfs7h62H6Pgwusq8giGz2W.PNG
    https://images.hive.blog/0x0/https://files.peakd.com/file/peakd-hive/edeyglezsosa/23w2o88qJviJiNX3Vfoz7v1faxSgWyrjwCVbwXPovSRhGHk1y1Y8vX6N4H5btXYaBXy4g.jpg
    And so we come to the end of the tutorial, as always I hope it has been to your liking, because for my part I enjoyed a lot of the preparation and tasting of this delicious drink that perfectly integrates the flavors of pineapple juice and orange liqueur, accompanied by the robustness of Havana Club Añejo Especial Rum.
    >>*Y así llegamos al final del tutorial, como siempre espero haya sido de su agrado, pues por mi parte disfruté un montón de la elaboración y cata de este delicioso trago que integra de manera perfecta los sabores del jugo de piña y el licor de naranja, acompañado de la robustez del Ron Havana Club Añejo Especial.*
    ![Snapshot_262.PNG](https://files.peakd.com/file/peakd-hive/edeyglezsosa/23x16ojfpZ2sApHyDP9Xz9ygYH4wnqeDE3EiKj93Rxd2oCLFwypC2FjKa3v9NbXGm793E.PNG)
    ![2dk2RRM2dZ8gKjXsrozapsD83FxL3Xbyyi5LFttAhrXxr16mCe4arfLHwFmYKkraGFYmHjrWK4gjrnfbYnAEWgiu7haPNvaeCAPaoSvqgV87wSQda4UzpKaAEHTpcJz95U6thCwr6azqBiXRtBeAZZKTgmJcpei7ZhAZjyFv7g.png](https://files.peakd.com/file/peakd-hive/edeyglezsosa/23tRrCsM8uF676cQdqTbrS852E58grkkwobSLvMV8UmdqmnfpWAdw8W5FyUCZhjvEzPts.png)
    `Thank you very much for reading my post. If you liked it, please leave a comment and consider following me so you don't miss my next posts. I'd love to know your opinion and your thoughts about the topic I discussed in this post, see you in the next one! `
    ![2dk2RRM2dZ8gKjXsrozapsD83FxL3Xbyyi5LFttAhrXxr16mCe4arfLHwFmYKkraGFYmHjrWK4gjrnfbYnAEWgiu7haPNvaeCAPaoSvqgV87wSQda4UzpKaAEHTpcJz95U6thCwr6azqBiXRtBeAZZKTgmJcpei7ZhAZjyFv7g.png](https://files.peakd.com/file/peakd-hive/edeyglezsosa/23tRrCsM8uF676cQdqTbrS852E58grkkwobSLvMV8UmdqmnfpWAdw8W5FyUCZhjvEzPts.png)
    ## Credits and Resources // Créditos y Recursos
    Cover page created in [**Canva**](www.canva.com)
    Translated by [**DeepL**](https://www.deepl.com/translator)
    Video and images captured with my **Samsung Galaxy A53**
    Edited in **Wondershare Filmora 13**
    Music by Sergii Pavkin from Pixabay
    ![Diseño sin título (2).gif](https://files.peakd.com/file/peakd-hive/edeyglezsosa/EoCiB5ktmvqL6mfMpsb6oH8oaTJnnypEYELWswd5zHy9mGT33MDmbdjJmL8neJ33K99.gif)
    3 min
  • How to make a chest with paper rolls. [ENG+ESP]
    https://3speak.tv/watch?v=edeyglezsosa/olzwfgmr
    ![Gray Monochrome Paper Photo Collage Gallery Video.png](https://files.peakd.com/file/peakd-hive/edeyglezsosa/23vhywLLwWcarAXdFbYctU7Mb4NbmuC4kRysn8DrZCZoAThhaW8YSrR7ibbor7kMMuYdF.jpg)
    Greetings friends of the crafting community. In past posts I have shown you how you can create and recycle at the same time. In other occasions I have used recycled cardboard as the main material, but today I will take a different approach. Today I bring you a tutorial where I will show you step by step how to create a chest using paper rolls. And if you just read that right, the chest is made almost entirely out of magazine paper rolls. With this craft I achieve two main goals: recycle a bunch of paper and get a new container to store things.
    I must admit that at first I was a little worried that the paper rolls might not have the necessary rigidity, but I must admit that I was surprised. As you will see below, the chest is not small at all and yet it shows considerable toughness. So I invite you to join me in this tutorial where we will be creating a chest made with paper rolls.
    >>*Saludos amigos de la comunidad de artesanos. En pasadas publicaciones les he mostrado cómo se puede crear y reciclar a la vez. En otras ocasiones he utilizado como material principal el cartón reciclado, pero hoy adoptaré un enfoque diferente. El día de hoy les traigo un tutorial donde les mostraré paso a paso cómo crear un cofre utilizando rollitos de papel. Y si acabas de leer bien, el cofre está elaborado casi en su totalidad con rollitos de papel de revista. Con esta manualidad logro dos objetivos principales: reciclar un montón de papel y obtener un nuevo recipiente para almacenar cosas.*
    >
    >>*Debo admitir que al principio me preocupó un poco la posibilidad de que los rollos de papel no contaran con la rigidez necesaria, pero debo admitir que me sorprendió. Como verán a continuación, el cofre no es para nada pequeño y aun así muestra una dureza considerable. Así que los invito a acompañarme en este tutorial donde estaremos creando un cofre hecho con rollitos de papel.*
    ## Materials // Materiales
    English
    Español
    ✔️ Paper
    ✔️ Papel
    ✔️ Cardboard
    ✔️ Cartón
    ✔️ Ruler, marker and compass
    ✔️ Regla, marcador y compás
    ✔️ Scissors
    ✔️ Tijeras
    ✔️ White paint and light carmelite
    ✔️ Pintura blanca y carmelita claro
    ✔️ Brushes
    ✔️ Pinceles
    ✔️ Silicone gun
    ✔️ Pistola de silicona
    ![20240617_163044.jpg](https://files.peakd.com/file/peakd-hive/edeyglezsosa/23wC9daddBtUZaX7X2sXfbECk4Pb7xkuWEDRNfMTagsz4GQEFmzUcnxAg22b2BFv449TR.jpg)
    ## Step by step // Paso a paso
    1️⃣ The first thing to do is to take the sheets of paper and wrap them on their longest side to form the paper rolls. To make the paper rolls we can use chopsticks or some other cylindrical tool of at least 6 mm in diameter. Once the rolls are made, cut them into segments of 11 cm, 18 cm and 25 cm.
    >>1️⃣ *Lo primero que se debe hacer es tomar las hojas de papel y envolverlas por su lado más largo para formar los rollitos de papel. Para hacer los rollitos de papel podemos utilizar unos palillos chinos o alguna otra herramienta cilíndrica de al menos 6 mm de diámetro. Una vez hechos los rollitos, los cortaremos en segmentos de 11 cm, 18 cm y 25 cm.*
    https://images.hive.blog/0x0/https://files.peakd.com/file/peakd-hive/edeyglezsosa/23xVEhKHrH7haEWKcCEEJjPhakXch3K6h9ZYvfLaAB35M5wQWJEh9S8P1NemYjH7h54bu.PNG
    https://images.hive.blog/0x0/https://files.peakd.com/file/peakd-hive/edeyglezsosa/23xKrQCAVjGAyYkbKQeLpaFRkSPVp7sgxfDMN2G2pkrzVUwnD74JDE8EHGeJay2afkggR.PNG
    https://images.hive.blog/0x0/https://files.peakd.com/file/peakd-hive/edeyglezsosa/23w2oL4UW7QmsvDbrtu3YyqZD46fXnkF1cgcdtXwRKu3WKfWyLjNur9VMEhjRyQcbQZFm.PNG
    https://images.hive.blog/0x0/https://files.peakd.com/file/peakd-hive/edeyglezsosa/23xedoKDxg6uWjXw9q61gh8gKg9fHFxWJhYpko3nqEekosdPBUm6dxw5p8Edeke7AWktq.PNG
    https://images.hive.blog/0x0/https://files.peakd.com/file/peakd-hive/edeyglezsosa/23xVGdcHH288KgHCww3fgbLysqVaGk5zwD6YM27bthi42tdnmDa7T9RB34RRoN8XTLnik.PNG
    https://images.hive.blog/0x0/https://files.peakd.com/file/peakd-hive/edeyglezsosa/23yTctmRxew5icP5Dgj3ibEnHFtMUJiE6Hxr7Vi1S3AaPZMzzxdXmd2wzNPGtpQhCqY7J.PNG
    2️⃣ With the segments we will form the grids that make up the sides of the chest. After creating the grids, we will glue them together, but not before putting a 25 cm x 18 cm piece of cardboard at the bottom.
    >>2️⃣ *Con los segmentos formaremos las rejillas que componen los laterales del cofre. Luego de creadas las rejillas, las pegaremos entre sí, no sin antes poner en el fondo una pieza de cartón de 25 cm x 18 cm.*
    https://images.hive.blog/0x0/https://files.peakd.com/file/peakd-hive/edeyglezsosa/23vhyeRWeYeThXxPvUk619uEPQHRFNjQxkLB4SSgDEMXYP8A61vsjDsmfKpUw2iEPgvns.PNG
    https://images.hive.blog/0x0/https://files.peakd.com/file/peakd-hive/edeyglezsosa/23wqiSDQixwoS2Z261HWa1QtpbzsQdXhnSZF1v4pCSkW4F7sHX5rfeQjZJWLXA2JZi41s.PNG
    https://images.hive.blog/0x0/https://files.peakd.com/file/peakd-hive/edeyglezsosa/23uQrWf8qawkbkgYsdokicTgdqHsEYfq9FogJcXWmjwk8oJFSuEd8ubdJ6NkUEWkAa3MF.PNG
    https://images.hive.blog/0x0/https://files.peakd.com/file/peakd-hive/edeyglezsosa/23uFTyY27VFMRkKnapqJUzP7sQMJtjYXQ9wkKY6XxfEMXsd5D1Sduzq471pVLRhs4AGZp.PNG
    https://images.hive.blog/0x0/https://files.peakd.com/file/peakd-hive/edeyglezsosa/23w2oQXXEzdcUCBbF7aD8tazAhTQ81rLaiZk469yYHnELNEhK2QA57NaBg3foV8oCxwXA.PNG
    https://images.hive.blog/0x0/https://files.peakd.com/file/peakd-hive/edeyglezsosa/23w2kgpcJhWY3PDMkToQN8XtnC66mAWc1sbrH4xb5RmkhBGmcV8mFofJMjNEPwNYKdHjL.PNG
    3️⃣ Now we will create the lid of the chest. To do this, we measure the length of the side grids and using a compass we will draw and cut out two semicircles. We will join the semicircles together using the larger paper rolls. Additionally, we will put the frames to the lid and the lock system, which consists of a set of paper rolls, which will be glued to the lid and the chest but in an intercalary way.
    >>3️⃣ *Ahora crearemos la tapa del cofre. Para ello, medimos la longitud de las rejillas laterales y utilizando un compás dibujaremos y recortaremos dos semicírculos. A los semicírculos los uniremos entre sí utilizando los rollitos de papel más grandes. Adicionalmente, pondremos los marcos a la tapa y el sistema de cerradura, el cual consiste en un conjunto de rollitos de papel, los cuales irán pegados a la tapa y al cofre pero en forma intercalada.*
    https://images.hive.blog/0x0/https://files.peakd.com/file/peakd-hive/edeyglezsosa/23tmJAyKX2xtNkbPZu7nJZTqZWsyLmbZjDEuVQRpnMBFrwGsVnWqWEaXDA4BCDYnuyQTr.PNG
    https://images.hive.blog/0x0/https://files.peakd.com/file/peakd-hive/edeyglezsosa/23wCE6NhPyS7iRv6DBaoXkze51Ty1SdwUbS2LPj4PfjNLbBrRXHv7NksJMDB7Jiihkjb1.PNG
    https://images.hive.blog/0x0/https://files.peakd.com/file/peakd-hive/edeyglezsosa/23vi4EcfowafLUF7MGQh5LZNtvcSd91pANhaDMY5Socac44EP2aTLxir3gxtVCJY1BB5y.PNG
    https://images.hive.blog/0x0/https://files.peakd.com/file/peakd-hive/edeyglezsosa/23wgPut2hBG1TyjFqpkR5EEwZ3chHz9oauLt9rvAP5fLD4a19N3iK2fGLPJLn6hkHZrr8.PNG
    https://images.hive.blog/0x0/https://files.peakd.com/file/peakd-hive/edeyglezsosa/23wC9dZLmpsq2zTvkiLAiKehU3oALLeom5VMqbTVniYU38ZYspgTdx5tR3nASUPzttHZT.PNG
    https://images.hive.blog/0x0/https://files.peakd.com/file/peakd-hive/edeyglezsosa/23uFTh6k1poaFFN9ttuggSkveUcMpi3fmi2MTnFuJGAJqRZ7BuL2SLf8oXjhwWu6WLQoi.PNG
    https://images.hive.blog/0x0/https://files.peakd.com/file/peakd-hive/edeyglezsosa/23uFVhoou6beqWDjRif9tzMnYXUhm88Dyv59pQGPFMTzMjXirPyfWE73eghQDxVmwzjgj.PNG
    4️⃣ The structure of the chest is ready and now we will create a few more paper rolls, but this time these paper rolls will be much longer than the others. One option is to cut the sheets in half and glue the ends together to make them longer. After creating the rolls, we will flatten them and weave them between the pillars of the grids.
    >>4️⃣ *Ya estaría lista la estructura del cofre y ahora pasaremos a crear unos cuantos rollitos de papel más, pero esta vez estos rollitos de papel serán mucho más largos que los otros. Una opción es recortar las hojas a la mita y pegar sus extremos para largar su tamaño. Luego de creados los rollitos, los aplanaremos y entretejeremos entre los pilares de las rejillas.*
    https://images.hive.blog/0x0/https://files.peakd.com/file/peakd-hive/edeyglezsosa/23wqfx8xgAJver2C45FcAirx2o4KptYvW8kQHYWqyfts89S3PF8xxxRr6VXCcP2fXWrkm.PNG
    https://images.hive.blog/0x0/https://files.peakd.com/file/peakd-hive/edeyglezsosa/23tmFznig5ZdLyWk7SNV7mG3RM4qG5LujQzhygie1X2PnRmgkzvrPTGaRUKt8w2mrRzRt.PNG
    https://images.hive.blog/0x0/https://files.peakd.com/file/peakd-hive/edeyglezsosa/23w2jHMmKroRSnbhqLpwQ9rED5mnnCJ1ddyaknuW7stXpg4qyLWkifJukGZPy89HwAutF.PNG
    https://images.hive.blog/0x0/https://files.peakd.com/file/peakd-hive/edeyglezsosa/23w2sLs5jxp8ovZkDgnPi39fU7oHaKyCnraFyXuBGec3MdrhVbroD8dYFgBa3UgbD9hvL.PNG
    https://images.hive.blog/0x0/https://files.peakd.com/file/peakd-hive/edeyglezsosa/23uFTmt7rVCorLrsj9kF3KT2Dsghufk52B158dp1jS8FYmaJC6dFTiKvKzoHZXFXQSAiH.PNG
    5️⃣ To finish we will apply a coat of white paint to the entire exterior surface of the chest. After the paint has dried, we will paint the lid frames with carmelite.
    >>5️⃣ *Para finalizar aplicaremos una capa de pintura blanca a toda la superficie exterior del cofre. Luego de secada la pintura pintaremos de carmelita los marcos de la tapa.*
    https://images.hive.blog/0x0/https://files.peakd.com/file/peakd-hive/edeyglezsosa/23u67YqmVYLG2uW6WXRgrhMNBwvznwp4ZTLL7VLSs69sVPwdYbBxFhkuwuHowLBzJviVY.PNG
    https://images.hive.blog/0x0/https://files.peakd.com/file/peakd-hive/edeyglezsosa/23wMcPAQ8bY27LHcHi2TSpAnKviLy3DF9m2tydHPcW5z4mcrD5vFMmS8jsREkiZuGzyBx.PNG
    https://images.hive.blog/0x0/https://files.peakd.com/file/peakd-hive/edeyglezsosa/23xAa7ZJqbQejwXAxBHinFETLwDc5wd1WLAUPzfCw5iQHSYdSySiULgsVDMfUoN8J6FHf.PNG
    https://images.hive.blog/0x0/https://files.peakd.com/file/peakd-hive/edeyglezsosa/23ywu7vLHudGHAarWRdRtguWZNfEV5pydzUjrJMJjGCBaY4zCvJPfhW7tFSEa3pAh9fD8.PNG
    https://images.hive.blog/0x0/https://files.peakd.com/file/peakd-hive/edeyglezsosa/23zGeHpX3QBJN7UE67tDVXmbDMJhMZDZbjuSB4jfi3ghDWgbS1AjRGpq9m1x6eGnnKeJb.PNG
    And so we come to the end of the tutorial. I hope you liked it and found it useful. I'll say goodbye for now, but not before remembering that you can leave me your considerations in the comments, because I will be happy to read them.
    >>*Y así llegamos al final del tutorial. Espero que fuese de su agrado y le resultase útil. Yo por ahora me despido, pero no si antes recordares que pueden dejarme sus consideraciones en los comentarios, pues estaré encantado de leerlos.*
    ## Finished Work // Trabajo Terminado
    https://images.hive.blog/0x0/https://files.peakd.com/file/peakd-hive/edeyglezsosa/23wC7JaPgfyD6G6Z46LrHjQrREfcGLtp3KGNX371LyYHeC6sRN16hqBcuZFPXbjYxyKDM.jpg
    https://images.hive.blog/0x0/https://files.peakd.com/file/peakd-hive/edeyglezsosa/23u5y2FQuoF5EB3EEBRNsGrB7DcXksYPSexgGncRrDPFh4E5YjcLst48pbYen7UyBD6dQ.jpg
    https://images.hive.blog/0x0/https://files.peakd.com/file/peakd-hive/edeyglezsosa/23w2gVRgAvoB5sMmRQcVESvPkPNVQztsPbhRqUtwjd346MdHH3cGwwMYWLtSKNxkReWyy.jpg
    https://images.hive.blog/0x0/https://files.peakd.com/file/peakd-hive/edeyglezsosa/23xARYA2GThDD32b2fE1FieihtkYn9VZWmwQTTsFrt5jPQyKSkKFhh8FUyLxUvF7mY5By.jpg
    https://images.hive.blog/0x0/https://files.peakd.com/file/peakd-hive/edeyglezsosa/23yd5mxxg5qPQfHkLLoG7YAtvf4JzYD4YeMmiSGW9qhC2EMZ7sp7fNU6dme54Y1nweAPm.PNG
    ![2dk2RRM2dZ8gKjXsrozapsD83FxL3Xbyyi5LFttAhrXxr16mCe4arfLHwFmYKkraGFYmHjrWK4gjrnfbYnAEWgiu7haPNvaeCAPaoSvqgV87wSQda4UzpKaAEHTpcJz95U6thCwr6azqBiXRtBeAZZKTgmJcpei7ZhAZjyFv7g.png](https://files.peakd.com/file/peakd-hive/edeyglezsosa/23tRrCsM8uF676cQdqTbrS852E58grkkwobSLvMV8UmdqmnfpWAdw8W5FyUCZhjvEzPts.png)
    `Thank you very much for reading my post. If you liked it, please leave a comment and consider following me so you don't miss my next posts. I'd love to know your opinion and your thoughts about the topic I discussed in this post, see you in the next one! `
    ![2dk2RRM2dZ8gKjXsrozapsD83FxL3Xbyyi5LFttAhrXxr16mCe4arfLHwFmYKkraGFYmHjrWK4gjrnfbYnAEWgiu7haPNvaeCAPaoSvqgV87wSQda4UzpKaAEHTpcJz95U6thCwr6azqBiXRtBeAZZKTgmJcpei7ZhAZjyFv7g.png](https://files.peakd.com/file/peakd-hive/edeyglezsosa/23tRrCsM8uF676cQdqTbrS852E58grkkwobSLvMV8UmdqmnfpWAdw8W5FyUCZhjvEzPts.png)
    ## Credits and Resources // Créditos y Recursos
    Cover page created in [**Canva Pro**](www.canva.com)
    Translated by [**DeepL**](https://www.deepl.com/translator)
    Video and images captured with my **Samsung Galaxy A53**
    Edited in **Wondershare Filmora 13**
    Music by Sergii Pavkin from Pixabay
    ![diy comunity banner.gif](https://files.peakd.com/file/peakd-hive/edeyglezsosa/23swXhgKCmFYtzonFjqXoVpivudgtk9kiS2eg2BsQT8cyMiD8vYPmGCgoNYZEPx9WVcLD.gif)
    [![banner witness hive diy.gif](https://files.peakd.com/file/peakd-hive/edeyglezsosa/Eo6MRjg61khD6eTqg7XAaKz45E7eNcQ9zJiK83zZfvj55W5Bnp1jszfFc9oFkM395zQ.gif)
    ](https://vote.hive.uno/@hivediy)
    ![Diseño sin título (2).gif](https://files.peakd.com/file/peakd-hive/edeyglezsosa/EoCiB5ktmvqL6mfMpsb6oH8oaTJnnypEYELWswd5zHy9mGT33MDmbdjJmL8neJ33K99.gif)
    4 min
  • A drink for "Ella": pineapple and maraschino liqueur [ENG+ESP]
    https://3speak.tv/watch?v=edeyglezsosa/xnmzymvd
    ![Beige & Orange Modern Pineapple Juice Instagram Post (1).png](https://files.peakd.com/file/peakd-hive/edeyglezsosa/23vsQfjiyyn57zGaLapA9ehGbsqWCAgAD6L96URgXHCfSp7V7HLWcEzZHHxvVQh71Ty9z.jpg)
    Greetings friends of the **Amazing Drinks** community. Today I bring you a videotutorial where I will show you how I will make my own interpretation of a Cuban drink called "Ella". I am sure that more than one connoisseur of the cocktail world will know that there is another drink with that name and that it is not Cuban, but the thing is that the Cubay brand of drinks launched a long time ago a line of liqueurs, which on the back had a recipe and this is one of them.
    Taking advantage of the fact that I own several copies of this line of liqueurs, I took as a reference the recipe printed on the back of the bottle of Cubay Pineapple Liqueur. And that is how the idea of making a series of video tutorials in which I will be elaborating some of these Cuban cocktail recipes was born. I hope you like it and let's start with the tutorial.
    >>Saludos amigos de la comunidad **Amazing Drinks**. El día de hoy les traigo un videotutorial donde les mostraré cómo realizaré mi propia interpretación de un trago cubano llamado “Ella”. Estoy seguro de que más de un conocedor del mundo de la coctelería sabrá que existe otro trago con ese nombre y que no es cubano, pero la cuestión es que la marca de bebidas Cubay lanzó hace mucho tiempo una línea de licores, los cuales en su reverso traían una receta y esta es una de ellas.
    >
    >>Aprovechando que yo poseo varios de los ejemplares de esta línea de licores, tomé como referencia la receta que viene impresa en el reverso de la botella de Licor de Piña Cubay. Y pues así fue como nació la idea de hacer una serie de videotutoriales en los cuales estaré elaborando algunas de estas recetas de coctelería cubana. Espero que les guste y comencemos con el tutorial.
    ![Snapshot_191.PNG](https://files.peakd.com/file/peakd-hive/edeyglezsosa/23wqiSDQMWrxiCDWNPPLRaABQke9zRm1j1eW99PTXAhbbEQR3kdR5CxXUuoDbM1cQG46k.PNG)
    ## Ingredients // Ingredientes
    English
    Español
    ✔️ 1/2 oz Pineapple Liqueur
    ✔️ 1/2 oz Licor de Piña
    ✔️ 1/3 oz Maraschino Liqueur
    ✔️ 1/3 oz Licor Marrasquino
    ✔️ 2/3 oz Lemon Juice
    ✔️ 2/3 oz Jugo de Limón
    ✔️ Frappé ice
    ✔️ Hielo frappé
    ![Snapshot_190.PNG](https://files.peakd.com/file/peakd-hive/edeyglezsosa/23vhwnSC4dcf7V5ZkfePrwusrJbt3FNWEnATGuadekfLTZS5G6AwPi1f5dMpSQaim9K2J.PNG)
    ## Tutorial Summary // Resumen del Tutorial
    1️⃣ To start preparing the drink, the first thing to do is to extract the lemon juice by cutting and squeezing some fresh lemons. The lemon juice should be strained to avoid contaminating the drink with seeds and remains of the lemon.
    >>1️⃣ Para empezar a preparar el trago, lo primero que se debe de hacer es extraer el jugo de limón cortando y exprimiendo algunos limones frescos. El juego de limón debemos colarlo para evitar contaminar el trago con semillas y restos del limón.
    https://images.hive.blog/0x0/https://files.peakd.com/file/peakd-hive/edeyglezsosa/23wC9ddiGPKFCiMGcrfSxAuVCRKt5FMkkYxc9B9jEpAwp51WRTFnEBDn1MLZEqNHfZP8N.PNG
    https://images.hive.blog/0x0/https://files.peakd.com/file/peakd-hive/edeyglezsosa/23xp4QXtj3Zb9WSEr83BXSCu2JTPH4NpvdGSQuHNmcJxnJPhRVrkGPaTMKybA5cjTxMwY.PNG
    https://images.hive.blog/0x0/https://files.peakd.com/file/peakd-hive/edeyglezsosa/23wqi9KFirRy4YJasYS6sev8zueHm6KnMeBBGVsL7vNKetE4hNjY2hg9Nk9F2nppL2WrK.PNG
    2️⃣ Next we will measure the dosage of the ingredients, which are 1/2 oz of pineapple liqueur, 1/3 maraschino liqueur and 2/3 oz of lemon juice. Once the dosage is well measured, we can continue.
    >>2️⃣ A continuación mediremos la dosificación de los ingredientes, los cuales son 1/2 oz de licor de piña, 1/3 licor de marrasquino y 2/3 oz de jugo de limón. Una vez que las cantidades esté bien medida, podemos continuar.
    https://images.hive.blog/0x0/https://files.peakd.com/file/peakd-hive/edeyglezsosa/23wzzvsMrWy1e5bR9ePMDGj16uZNygotHUvg1DZFtgBnLBvQkVpFZKd94knxkjJNkDWBT.PNG
    https://images.hive.blog/0x0/https://files.peakd.com/file/peakd-hive/edeyglezsosa/23wqdqgAHc3SpHaoTEAT1CBLgVyay5X59NKBRYhwgce8kv8HNBxq72QRtRnHMHwH9wJsz.PNG
    https://images.hive.blog/0x0/https://files.peakd.com/file/peakd-hive/edeyglezsosa/23w2sLuAjdhrh1ZwD12V4b1r8eBn9wvMGG1Q4wKAy2eiwY5hhfmrmJwWEpbZncbe7BDLk.PNG
    3️⃣ After making the correct measurements, combine all the ingredients in a bowl and mix for a while to homogenize the drink.
    >>3️⃣ Luego de realizar las correctas mediciones unimos todos los ingredientes en un recipiente y mezclamos durante un tiempo para homogenizar el trago.
    https://images.hive.blog/0x0/https://files.peakd.com/file/peakd-hive/edeyglezsosa/23vsNJuYxeJiRSFEgkNxuz7XY4UoLvjk8iWu6gesAtmcveyFgT3pRr2ZhUch4Y4xSVEEF.PNG
    https://images.hive.blog/0x0/https://files.peakd.com/file/peakd-hive/edeyglezsosa/23wC9noU5gdKywexh1J4ZCBhWjgFg2BzNSNrSyGojo4UGRQZEmXR5YtosCMNqoeHw7Z6t.PNG
    https://images.hive.blog/0x0/https://files.peakd.com/file/peakd-hive/edeyglezsosa/23uQrMYMYpdKT7eV1eDjqdTfYoXv55M3abQFo5cx1NUxR2i8WKZoBTYJ9xM86A4zLtoDi.PNG
    https://images.hive.blog/0x0/https://files.peakd.com/file/peakd-hive/edeyglezsosa/23vhyN6DHnTQ2V9FgrYn78K4L8B1uKL19pY8R4X9MNwUNVWnvecjDE6JU8jyRnoD9Ac9K.PNG
    4️⃣ Before serving we will apply the decoration. For this drink I decided to apply a golden rim of honey to the glass. It is important to keep in mind that if the honey is very liquid, you can freeze the glass beforehand so that it does not flow down the walls until it reaches the bottom of the glass.
    >>4️⃣ Antes de servir aplicaremos la decoración. Para este trago decidí aplicar un borde dorado de miel al vaso. Es importante tener en cuenta que, si la miel está muy líquida, se puede congelar previamente el vaso para que esta no fluya por sus paredes hasta llegar completamente abajo.
    https://images.hive.blog/0x0/https://files.peakd.com/file/peakd-hive/edeyglezsosa/23w2kpyc7BtLtorXLmj5X8QghdL64W6Do8pUHXF6DNyqcKtxp9crTzJKYRrJp8E9F3FnV.PNG
    https://images.hive.blog/0x0/https://files.peakd.com/file/peakd-hive/edeyglezsosa/23w2q4LuKTJV2mNTWonNQDgUYKj5mBu6XYt8yj3a53qnQNKBLr8YzgLWS1fr3Xxwe83Xu.PNG
    https://images.hive.blog/0x0/https://files.peakd.com/file/peakd-hive/edeyglezsosa/23wCBeAxFEtqXY9vzcrpJ3enxrm4xvEtucwpUwF35CbP3idaqkjGwHN8mzrKjkbAuRT55.PNG
    5️⃣ Once the glass is decorated, fill halfway with frappé ice and serve our drink.
    >>5️⃣ Una vez decorado el vaso, rellenamos hasta la mitad con hielo frappé y servimos nuestro trago.
    https://images.hive.blog/0x0/https://files.peakd.com/file/peakd-hive/edeyglezsosa/23w2oCrJfyaoaEBVChuw4eedsjas44TS7cqciDbK8e3xrtTdvfNRYjJbqrf28trRxWPwd.PNG
    https://images.hive.blog/0x0/https://files.peakd.com/file/peakd-hive/edeyglezsosa/23wC9nom7AsHrGS38JbrbsDH5jHmc248Z3FCCD3MhqYB38a8MkR4A8HiJff1E3vZZf1Ka.PNG
    https://images.hive.blog/0x0/https://files.peakd.com/file/peakd-hive/edeyglezsosa/23wqgR666xFp7CWstweAQfhRuSYNSRM3oVWCZu3K87vMQ8RUe8CheFBBeYTtnnGpHggrQ.PNG
    https://images.hive.blog/0x0/https://files.peakd.com/file/peakd-hive/edeyglezsosa/23wMRrM5as4aGSRYZ3bpj3ZQqhutYXNYNwvyGoD1yuhpG6BFZk8Lk5dvRBWrsgFZ7VVa7.PNG
    ## Final Result // Resultado Final
    https://images.hive.blog/0x0/https://files.peakd.com/file/peakd-hive/edeyglezsosa/23wqiZymr2VxiqeKtUJxKsq1e5dpZZnkjDLk5XWMyYus4RDF9xSUn6WjcgmMem41KfJJh.jpg
    https://images.hive.blog/0x0/https://files.peakd.com/file/peakd-hive/edeyglezsosa/23xKpQTUfUMHzVZJpaXbUwq6LjdKnmQUzJG4Q5jshPLmnGHzsCkKTB59ik1v86au8ZNt3.jpg
    So much for today's tutorial, I hope you liked it and found it interesting. For now I say goodbye, but soon I will be back to show you another of my incursions into the world of cocktails.
    >>Hasta aquí el tutorial de hoy, espero que haya sido de su agrado y lo hayan encontrado interesante. Por ahora me despido, pero pronto estaré de vuelta para mostrarles otra más de mis incursiones en el mundo de la coctelería.
    https://files.peakd.com/file/peakd-hive/edeyglezsosa/23uFMFTrXiBKM4mXW3EXtp8GYZrrEoULSF57m4fhSr3KUBqcQEjvwx6VTGceZkKWD4o7z.PNG
    ![2dk2RRM2dZ8gKjXsrozapsD83FxL3Xbyyi5LFttAhrXxr16mCe4arfLHwFmYKkraGFYmHjrWK4gjrnfbYnAEWgiu7haPNvaeCAPaoSvqgV87wSQda4UzpKaAEHTpcJz95U6thCwr6azqBiXRtBeAZZKTgmJcpei7ZhAZjyFv7g.png](https://files.peakd.com/file/peakd-hive/edeyglezsosa/23tRrCsM8uF676cQdqTbrS852E58grkkwobSLvMV8UmdqmnfpWAdw8W5FyUCZhjvEzPts.png)
    `Thank you very much for reading my post. If you liked it, please leave a comment and consider following me so you don't miss my next posts. I'd love to know your opinion and your thoughts about the topic I discussed in this post, see you in the next one! `
    ![2dk2RRM2dZ8gKjXsrozapsD83FxL3Xbyyi5LFttAhrXxr16mCe4arfLHwFmYKkraGFYmHjrWK4gjrnfbYnAEWgiu7haPNvaeCAPaoSvqgV87wSQda4UzpKaAEHTpcJz95U6thCwr6azqBiXRtBeAZZKTgmJcpei7ZhAZjyFv7g.png](https://files.peakd.com/file/peakd-hive/edeyglezsosa/23tRrCsM8uF676cQdqTbrS852E58grkkwobSLvMV8UmdqmnfpWAdw8W5FyUCZhjvEzPts.png)
    ## Credits and Resources // Créditos y Recursos
    Cover page created in [**Canva Pro**](www.canva.com)
    Translated by [**DeepL**](https://www.deepl.com/translator)
    Video and images captured with my **Samsung Galaxy A53**
    Edited in **Wondershare Filmora 13**
    Music by Noru from Pixabay
    ![Diseño sin título (2).gif](https://files.peakd.com/file/peakd-hive/edeyglezsosa/EoCiB5ktmvqL6mfMpsb6oH8oaTJnnypEYELWswd5zHy9mGT33MDmbdjJmL8neJ33K99.gif)
    3 min
  • How to make a recycled cardboard shelf decorated with fomi ♻️ [ENG+ESP]
    https://3speak.tv/watch?v=edeyglezsosa/jodtusdp
    https://images.ecency.com/DQmUFkVVeYwMryTSG37wHMoBGGPWCY4AMSVsLRfRTtMNhkS/snapshot_146.png
    Greetings friends of the community. Even though World Environment Day was last June 5th, I am still focusing my crafts on recycling. No matter how important the date is, every day can be World Environment Day if we somehow do our bit for the environment.
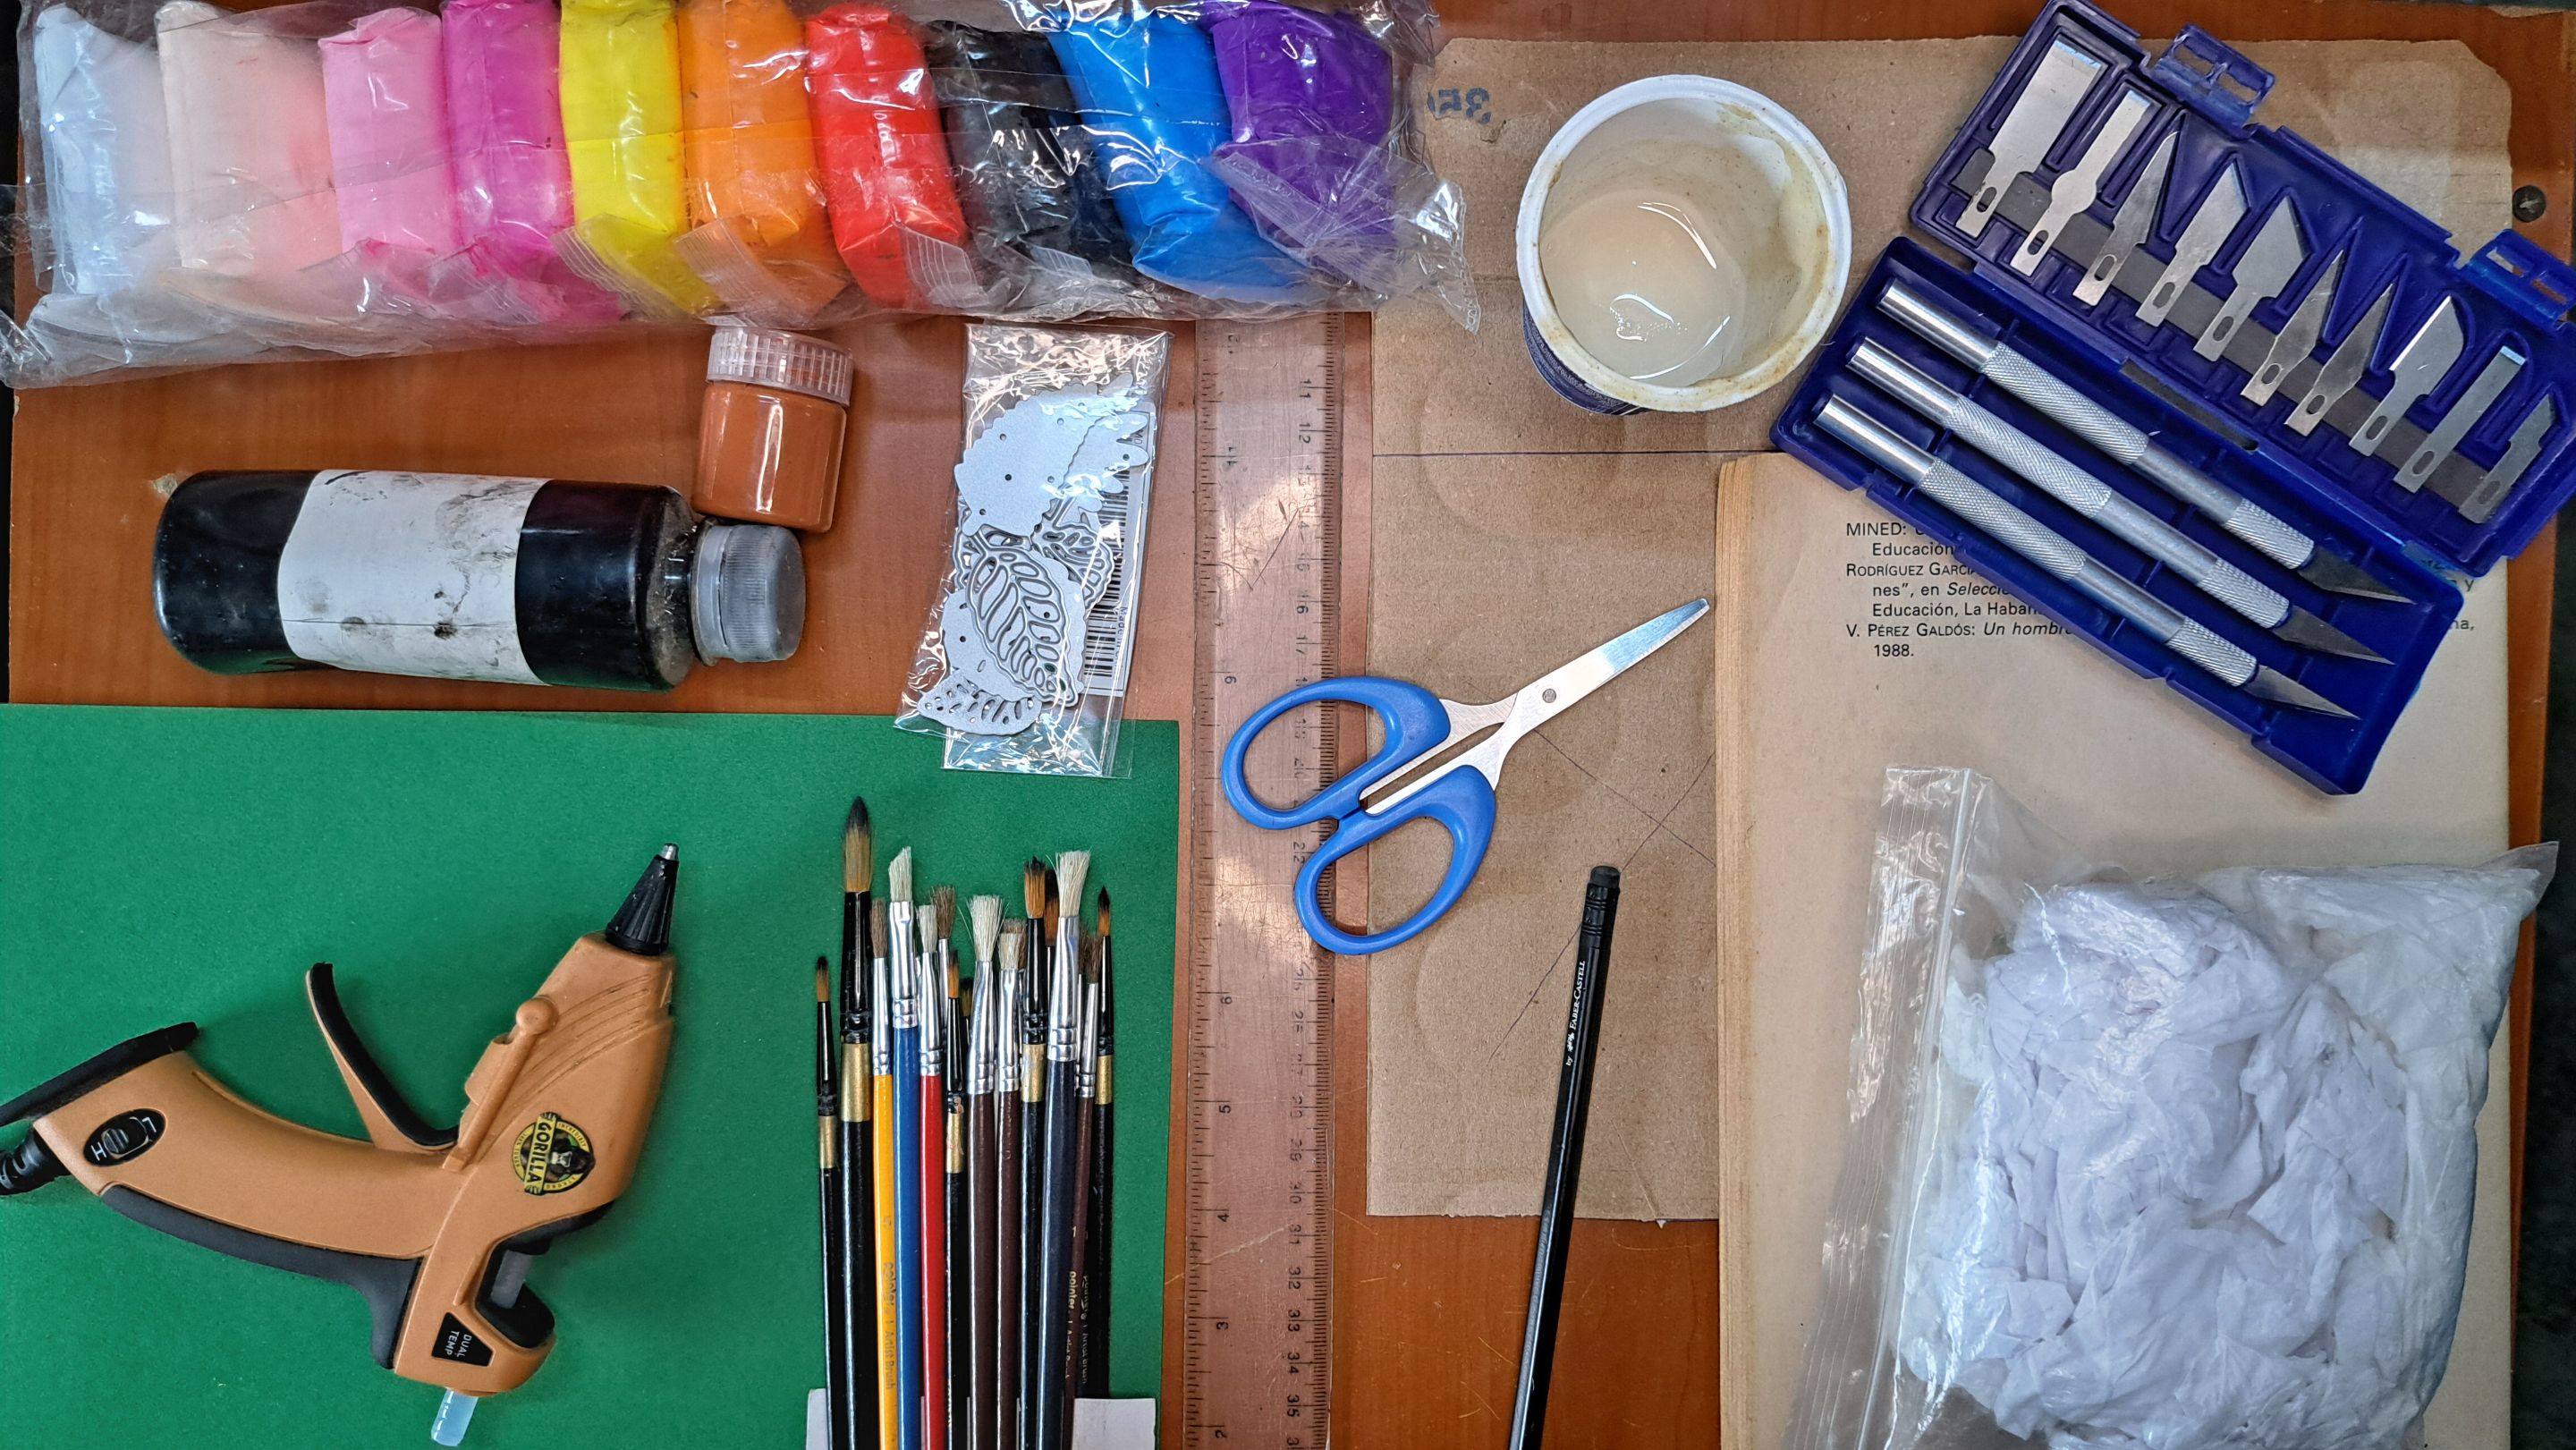
    For my part, I have decided to do something with the excess cardboard and papers I have stored, so today I bring you a video tutorial where I will show you how to make some shelves using recycled cardboard and then decorating them with fomi. I must say that this craft not only contributes to recycling, but also helps me to organize a little my work station and will allow me in the future to have some tools at hand but with easy access.
    But well, without further ado, let's start with the tutorial, which I hope you like. Remember that the exact measurements are in the video, as well as a more detailed explanation.
    >! [Spanish Version Here]
    >*Saludos amigos de la comunidad. A pesar de que el día mundial del medio ambiente fue el pasado 5 de junio, todavía sigo enfocando mis manualidades en el reciclaje. No importa qué tan importante sea la fecha que haya pasado, todos los días pueden ser el día del medio ambiente si de alguna manera aportamos nuestro granito de arena en su cuidado.*
    >
    >*Por mi parte, he decidido hacer algo con el exceso de cartón y papeles que tengo almacenados, así que hoy les traigo un videotutorial donde les mostraré cómo hacer unas repisas utilizando cartón reciclado y posteriormente adornándolas con fomi. Debo decir que esta manualidad no solo aporta al reciclaje, sino que también me ayuda a organizar un poco mi puesto de trabajo y me permitirá en el futuro tener algunas herramientas a mano pero con fácil acceso.*
    >
    >*Pero bueno, sin más dilaciones, empecemos con el tutorial, el cual espero que sea de su agrado. Recuerden que las medidas exactas están en el video, así como una explicación más detallada.*
    ## Materials // Materiales
    English
    Español
    ✔️ Recycled cardboard
    ✔️ Cartón reciclado
    ✔️ Cutting and carving tools
    ✔️ Herramientas de corte y troqueles
    ✔️ Silicone gun
    ✔️ Pistola de silicona
    ✔️ Adhesive with a flour base
    ✔️ Pegamento con base de harina
    ✔️ Scissors, ruler, and pencil
    ✔️ Tijeras, regla y lápiz
    ✔️ Moldable Fomi and green Fomi sheet
    ✔️ Fomi moldeable y lámina de fomi verde
    ✔️ Magazine paper and kitchen paper
    ✔️ Papel de revista y papel de cocina
    ✔️ Carmelite paint and black acetite paint
    ✔️ Pintura carmelita y pintura de acetite negra
    ✔️ Brush set
    ✔️ Set de pinceles
    ![20240610_091009.jpg](https://files.peakd.com/file/peakd-hive/edeyglezsosa/23vsNg79fYERg5u6eCEjTpfMRny2YuakkYsFbb9j82UMH9N1F3gvmZEWuZnuGabke7w7Z.jpg)
    ## ⚜️ Summary of the Tutorial // Resumen del Tutorial ⚜️
    1️⃣ To begin, mark and cut out 8 cardboard strips of 40 cm x 10 cm, which we will glue in pairs to form four wider strips. To facilitate fastening and gluing, use toothpicks.
    >! [Spanish Version Here]
    >*1️⃣ Para empezar, se deben marcar y recortar 8 listones de cartón de 40 cm x 10 cm, los cuales pegaremos en parejas para formar cuatro listones más anchos. Para facilitar la sujeción y el pegado, emplea palillos de tenderas.*
    https://images.hive.blog/0x0/https://files.peakd.com/file/peakd-hive/edeyglezsosa/23vi87C3r1hmbFF6FZKWX21Msr9ktnFR62jWhGiLffwNEmmkmpKzGcgK1svwkVChR7U2q.PNG
    https://images.hive.blog/0x0/https://files.peakd.com/file/peakd-hive/edeyglezsosa/23uFe9wXKRoX4jEfBZ2GuD3dbGcMTgutNHWyq6Hh73gjRUiSWs9tswzk9r8wnKjGyvX2S.PNG
    https://images.hive.blog/0x0/https://files.peakd.com/file/peakd-hive/edeyglezsosa/23tc3HFqwdAMaFW7ZbYhvMPT1XRSazVzzvKTcbyLJuFZVPJp9CSGCxyy8waPC68n9HVEZ.PNG
    https://images.hive.blog/0x0/https://files.peakd.com/file/peakd-hive/edeyglezsosa/23wqkHjQCoeV6EnLrXYyc3S5T9uL6QMkRTQXUYX8hNHjeiZfRjBDYv2LV6LvpRhX7dFp7.PNG
    https://images.hive.blog/0x0/https://files.peakd.com/file/peakd-hive/edeyglezsosa/23vi42TWHo7tqjqMS13dzBC4yw4uv4exzzz27v4FteXTkVQWeUPLuEDyD1XiptmJikff8.PNG
    https://images.hive.blog/0x0/https://files.peakd.com/file/peakd-hive/edeyglezsosa/23xehbefavz9cg9ovPPrBytajG3ncRrvg3PrumPd2RiuazNQ7Q66qz9zDhiASLqT34kuA.PNG
    2️⃣ Next, repeat the process of the previous step, but this time the measurements will be 20 cm x 10 cm. This way the divisions are ready.
    >! [Spanish Version Here]
    >*2️⃣ A continuación, se repite el proceso del paso anterior, pero esta vez las medidas serán 20 cm x 10 cm. De esta forma quedarían listas las divisiones.*
    https://images.hive.blog/0x0/https://files.peakd.com/file/peakd-hive/edeyglezsosa/23w2qC8ACsenF24dY2Q7vGTUJPtmYQL9XFjbskipfixtuey5waeWWWgVFAMcxY3eZuKRm.PNG
    https://images.hive.blog/0x0/https://files.peakd.com/file/peakd-hive/edeyglezsosa/23wCFvSdWXtHhgBBeYsWaeEHqzFxhksWJuXzXWd8GdQ2X3zVFZfJARwPofsAamhYmbShm.PNG
    https://images.hive.blog/0x0/https://files.peakd.com/file/peakd-hive/edeyglezsosa/23wX1FUNDSTafPe4yb8fkdTUjVtYtaBtq7ZbTpHnSVyzsVa1Xcqv6FN5cYFuxHCee5mnu.PNG
    https://images.hive.blog/0x0/https://files.peakd.com/file/peakd-hive/edeyglezsosa/23uFY5ByHWehQLYwKMh1NYvF5tWhLnRVL7XZ4J9KSyMsgESWRCaxCvrrNxT2226eMKJbj.PNG
    https://images.hive.blog/0x0/https://files.peakd.com/file/peakd-hive/edeyglezsosa/23xyWzQtPUbPVjL4Aa6mSDePFoha72AMt1n2PGsJTYcQ9qxT8Wz9vWkw6ZERzNjpYkoSy.PNG
    3️⃣ To create the main structure, mark the middle of the large slats and then glue two small slats perpendicularly. One slat will be glued in the middle and the other at one end.
    >! [Spanish Version Here]
    >*3️⃣ Para crear la estructura principal se debe marcar la mitad de los listones grandes y luego pegar perpendicularmente dos listones pequeños. Un listón irá pegado en el medio y el otro en uno de sus extremos.*
    https://images.hive.blog/0x0/https://files.peakd.com/file/peakd-hive/edeyglezsosa/23tvkt76BFiXrnG6muVpQUfn991ijSVfUenT7t6661QLXawCeCfWTqzNoLmnTToyYi5gh.PNG
    https://images.hive.blog/0x0/https://files.peakd.com/file/peakd-hive/edeyglezsosa/23wCDrVP79ReDpNRtdLFiKxqve6ayoFvreHjeiH6LKLwgcUayXiDDLtMXGCr9nXwqSnwn.PNG
    https://images.hive.blog/0x0/https://files.peakd.com/file/peakd-hive/edeyglezsosa/23vsSc6AwzdM74aPnFsbnceBe4sfq61GCVJG1n1KZcXySCvR3yyMaKqN5MKmehiq5yZxo.PNG
    https://images.hive.blog/0x0/https://files.peakd.com/file/peakd-hive/edeyglezsosa/23w2qUYYVHawt3tmKJpMJmGky4JW1Ky2N1aofK5jk3Sh6CtYzNSNFGD9wXqmv5tnuGhAK.PNG
    https://images.hive.blog/0x0/https://files.peakd.com/file/peakd-hive/edeyglezsosa/23xKvA5k2m9J9N19B922tGhn8j77hrYBxdkjJFsz54PxN41J6hMZboSVEd4xwp2E5J9ZE.PNG
    4️⃣ Once the structure is created, proceed to cut out magazine or newspaper, which will be glued around the entire edge of the structure using flour-based glue. Once it is dry, make rolls of magazine paper and glue them with silicone on one side of the structure to simulate the relief of a wooden branch.
    >! [Spanish Version Here]
    >*4️⃣ Una vez creada la estructura, procede a recortar papel de revista o periódico, el cual se pegará alrededor de todo el borde de la estructura utilizando pegamento con base de harina. Una vez que esté seco, haz rollos de papel de revista y pégalos con silicona en una de las caras de la estructura para simular el relieve de una rama de madera.*
    https://images.hive.blog/0x0/https://files.peakd.com/file/peakd-hive/edeyglezsosa/23vhz7WdPMPYNykNts39T5mwpad9t1G575A4bnWUFk91jX4JLwz8hVfHwgztWYcrC3tvd.PNG
    https://images.hive.blog/0x0/https://files.peakd.com/file/peakd-hive/edeyglezsosa/23xKtGAimUJaPNTiJGzFq65k7ENkAiJzjNeZRfGbXUJ1y3ACTivne7w8ZAogysogJALvk.PNG
    https://images.hive.blog/0x0/https://files.peakd.com/file/peakd-hive/edeyglezsosa/23wMYT7eiseduLAHsxfN5qx7G5UyEacN5j7hE1zE32ksPWRFkin3X4QEQuZeU9Wwh8Adt.PNG
    https://images.hive.blog/0x0/https://files.peakd.com/file/peakd-hive/edeyglezsosa/23vsNPCYtEY8ve5LxvfPzFyzUzxdDDkuu3BX7jcTuR11fdr1hsiXc3wJygP5qCuDnR13n.PNG
    https://images.hive.blog/0x0/https://files.peakd.com/file/peakd-hive/edeyglezsosa/23wWy783BX5riBqCYCY5p2jgrryA7J46bvwJCEggbEXUw5BqPgFc8wku9LJW1773YLf6J.PNG
    https://images.hive.blog/0x0/https://files.peakd.com/file/peakd-hive/edeyglezsosa/23tmHRZ8ZYCesKckYAMqj7GKQ4TYym9s5nYkDkCnANVMja5rkVfooupdy3LeGsg6zYhoG.PNG
    https://images.hive.blog/0x0/https://files.peakd.com/file/peakd-hive/edeyglezsosa/23vsNmNbk58GgCJP387myBHjwVrJ7uT9rgBkmCjRvj6Sft7j2icY2SymiYK7WQsusH2KA.PNG
    5️⃣ After gluing the paper rolls to the structure, cover them with paper towels and glue to integrate everything and seal the separations.
    >! [Spanish Version Here]
    >*5️⃣ Luego de pegar los rollos de papel en la estructura, se procede a cubrirlos con papel de cocina y pegamento para integrarlo todo y sellar las separaciones.*
    https://images.hive.blog/0x0/https://files.peakd.com/file/peakd-hive/edeyglezsosa/23tvgjcti8dPURouBG7KhkcZCmis32M7tGar2Ym8xR21uiMak4pKGAXsj8f4zEsSSTP9z.PNG
    https://images.hive.blog/0x0/https://files.peakd.com/file/peakd-hive/edeyglezsosa/23tvgjctghPbpyfuZA33LtkhzZjdYjTtx7awAmLck9mawwo94nmpNM73sw8t23Dgg6zCS.PNG
    https://images.hive.blog/0x0/https://files.peakd.com/file/peakd-hive/edeyglezsosa/23vsLKCMPW19dQdkZQPurmRMKNCACe39U81onDhLZTNhiv1mZ7cpg6UdtBnnuo6UFck9F.PNG
    6️⃣ When everything is dry, apply a coat of black paint. I chose to use oil paint, as this ensures that the shelf is resistant to moisture. After drying for a while, a coat of carmelite paint is applied around the edge to color the faux wood branch.
    >! [Spanish Version Here]
    >*6️⃣ Cuando todo esté seco, se aplica una capa de pintura negra. Yo escogí utilizar pintura de aceite, pues así garantizo que la repisa sea resistente a la humedad. Luego de secar por un tiempo, se aplica una capa de pintura carmelita por el borde para darle color a la rama de madera falsa.*
    https://images.hive.blog/0x0/https://files.peakd.com/file/peakd-hive/edeyglezsosa/23vsSmdsVaruHPjykewM1fTqm8ZCskki9tSC7ypkedkGnFi4hrSmfNp6y7nD6xxXCfjfJ.PNG
    https://images.hive.blog/0x0/https://files.peakd.com/file/peakd-hive/edeyglezsosa/23uFXmkwDXiKwYRJiweK3dh982uKxrgnFQJWTqCsKjE8RWJsesPX99TJM4vjwFbopcUtw.PNG
    https://images.hive.blog/0x0/https://files.peakd.com/file/peakd-hive/edeyglezsosa/23uQtMd2kciJvZGD3d4tXUbkQKh8aKYa7XBMq6ewiXMoP9S9uR9JPwi3ymdoW4Vi68iTw.PNG
    https://images.hive.blog/0x0/https://files.peakd.com/file/peakd-hive/edeyglezsosa/23wCC964iDALTCMhGqHEjXR9tDLCUREux5oUCcWCbNWAtvMpjqaw5ie58gVW2TF2MiHPs.PNG
    https://images.hive.blog/0x0/https://files.peakd.com/file/peakd-hive/edeyglezsosa/23xp6U2tsext9prsJEQUD4eHrvxEahzu3pY7cwVhhLrKj1ddUzJTtC7Bb3ZtKXjaA1P86.PNG
    https://images.hive.blog/0x0/https://files.peakd.com/file/peakd-hive/edeyglezsosa/23vi1sbzbkmTFBnyGwEVDwM7k1nyhskzmjeuJUmnLwdT35dNbdPQbqDH3mdY6hLzMJHaq.PNG
    7️⃣ Next, cut out some leaves using a sheet of plain green fomi. These leaves will be glued to the corners of the structure and on top of the fake branch. For the leaves, I used die cuts, but you can also draw and cut them out by hand.
    >! [Spanish Version Here]
    >*7️⃣ A continuación, se recortan unas hojas utilizando una lámina de fomi verde liso. Estas hojas se pegarán en las esquinas de la estructura y encima de la falsa rama. Para las hojas, he utilizado unos troqueles, pero también se pueden dibujar y recortar a mano.*
    https://images.hive.blog/0x0/https://files.peakd.com/file/peakd-hive/edeyglezsosa/23wqgbHMtQBZfbmnHHC6PfnqJrbtjLTJ3gwrHebh7zgxFX79VF4NQUbDeeAHbv7wfjGQv.PNG
    https://images.hive.blog/0x0/https://files.peakd.com/file/peakd-hive/edeyglezsosa/23xVFDoXcwCMkAsurQ78u2gZn13dU9EPEoHKHfyC91u7Saenhp6APKf7pc4MdYraFtpwg.PNG
    https://images.hive.blog/0x0/https://files.peakd.com/file/peakd-hive/edeyglezsosa/23yThUsT82eiw3j7iwCsFBC1mSGeQQ5VDyUr7zkD5d5zXKGpYHKi4DXcR92qYuJDnJ85Q.PNG
    https://images.hive.blog/0x0/https://files.peakd.com/file/peakd-hive/edeyglezsosa/23xVMRuKakvx9q3AeqrAc2pNrP1bb6LfYFjKPs8r5edBvv3wYKSkFJgoE9u6P2LV8qwDq.PNG
    https://images.hive.blog/0x0/https://files.peakd.com/file/peakd-hive/edeyglezsosa/23xKrYxsdXzSvybvtpksWAoGXJNcSvj8XTp87HJWqzGWvKJvvj49sdMXM9cDooTZ23gHw.PNG
    https://images.hive.blog/0x0/https://files.peakd.com/file/peakd-hive/edeyglezsosa/23wCBms5C5qKCHVp74MMHy1QM55eo8myWtB4X15wwtUXxN1xDpDVJtTP53AfBHqtma937.PNG
    https://images.hive.blog/0x0/https://files.peakd.com/file/peakd-hive/edeyglezsosa/23xehwHB9eNvCs7XoiQNCkJxazDmVhgVRFuKCLtwYhk6txEvKBHXpmSYcLpva2TBw7Rx1.PNG
    8️⃣ Then, using moldable fomi, 5 flowers of different colors will be created. These are made by flattening small balls of fomi to make the petals.
    >! [Spanish Version Here]
    >*8️⃣ Luego, utilizando fomi moldeable, se crearán 5 flores de distintos colores. Estas se realizan aplanando bolitas de fomi para hacer los pétalos.*
    https://images.hive.blog/0x0/https://files.peakd.com/file/peakd-hive/edeyglezsosa/23y8siUdBg8vWkXarD9v42asqmn4TMz7E6bckvy3qJbBGQs2FGBR8FiLfEBLuy8kmNeBN.PNG
    https://images.hive.blog/0x0/https://files.peakd.com/file/peakd-hive/edeyglezsosa/23vsQcM99eD4gnMiz5cZyzJEG9uwcrbd45xxZ4n6LHQ35WQuoEc9MDtnQitnqTr7iz28p.PNG
    https://images.hive.blog/0x0/https://files.peakd.com/file/peakd-hive/edeyglezsosa/23wCC4smoRNJjkHQQKYm9P4gErogToB3oFXjvFGv13ZXRNE7mqi7p5THCakRtjmJuD1Bm.PNG
    https://images.hive.blog/0x0/https://files.peakd.com/file/peakd-hive/edeyglezsosa/23uFXmrw5UVDL5rrC2r3B7xrVJZwU1ZrjpbkXbpkmYP3nAC4bcPqKaSGN8PPPWCYCampN.PNG
    https://images.hive.blog/0x0/https://files.peakd.com/file/peakd-hive/edeyglezsosa/23ywrxeN5eztJQDUJCQ4faAqcpDA882xbMVpGVGigcw13xiTX95bUU8zMVLY4gX5UePnY.PNG
    9️⃣ Finally, each of the flowers will be glued to the corners of the structure in such a way that they cover the joints of the leaves.
    >! [Spanish Version Here]
    >*9️⃣ Para finalizar, cada una de las flores se pegará en las esquinas de la estructura de forma tal que cubran las uniones de las hojas.*
    https://images.ecency.com/DQmPTbM8Fw5K7Q4tcGSH79vvTymkS8ruwq45ixAmZGtSRhg/snapshot_142.png https://images.ecency.com/DQmWGySrNatWn2TBX8kDUknZPF1Ywy1oxgHnjLPvwaG7u7e/snapshot_143.png
    https://images.ecency.com/DQmajrUHmAmkXmvKdhMKxTiZmD4cdcRVJkmjyM5UjVFZPaZ/snapshot_144.png https://images.ecency.com/DQmPYbyH8Z4QZwLUaE29NZcPNL3twj18VZ1NEgbzKxe1orW/snapshot_141.png https://images.ecency.com/DQmfKTvqtqpRpqp2UaJXHdYaKrpaHmiHP4D9stLk92r2rPX/snapshot_145.png
    And this is the end of the tutorial. I remind you that each of the steps must be applied to the two shelves. Although they are separated, they actually form a single piece, which allows us to play with the distribution and the final shape.
    >! [Spanish Version Here]
    >*Y de esta forma termina el tutorial. Les recuerdo que cada uno de los pasos debe ser aplicado a las dos repisas. Aunque están separadas, en realidad forman una sola pieza, lo que al estar separadas nos permite jugar con la distribución y la forma final.*
    ## ⚜️ Finished Work // Trabajo Terminado ⚜️
    https://images.ecency.com/DQmUFTx3SJV42mj2wcoVrJRkEJ2tNYH5Ny7fkXQa7DRJwhB/20240610_091700.jpg https://images.ecency.com/DQmXAiuiW8tfWA4srVzgcLirjU8vMuCrfby46FNahQAU43Z/20240610_091714.jpg
    https://images.ecency.com/DQmXhhocQcRLhFDCUk7W4wXEJXBQTP2DZatCiwJkntQCJGx/20240610_091718.jpg https://images.ecency.com/DQmPoagShJZYQFdEVHhkoNpPsbHmD4oswGMkkaTm9heFPei/20240610_091725.jpg https://images.ecency.com/DQmbSPTCS8WcxUZLfscg6b2A5KQoCaz4rYaMnPWJ7Yiuzvb/20240610_091734.jpg

    ![2dk2RRM2dZ8gKjXsrozapsD83FxL3Xbyyi5LFttAhrXxr16mCe4arfLHwFmYKkraGFYmHjrWK4gjrnfbYnAEWgiu7haPNvaeCAPaoSvqgV87wSQda4UzpKaAEHTpcJz95U6thCwr6azqBiXRtBeAZZKTgmJcpei7ZhAZjyFv7g.png](https://files.peakd.com/file/peakd-hive/edeyglezsosa/23tRrCsM8uF676cQdqTbrS852E58grkkwobSLvMV8UmdqmnfpWAdw8W5FyUCZhjvEzPts.png)
    `Thank you very much for reading my post. If you liked it, please leave a comment and consider following me so you don't miss my next posts. I'd love to know your opinion and your thoughts about the topic I discussed in this post, see you in the next one! `

    ![2dk2RRM2dZ8gKjXsrozapsD83FxL3Xbyyi5LFttAhrXxr16mCe4arfLHwFmYKkraGFYmHjrWK4gjrnfbYnAEWgiu7haPNvaeCAPaoSvqgV87wSQda4UzpKaAEHTpcJz95U6thCwr6azqBiXRtBeAZZKTgmJcpei7ZhAZjyFv7g.png](https://files.peakd.com/file/peakd-hive/edeyglezsosa/23tRrCsM8uF676cQdqTbrS852E58grkkwobSLvMV8UmdqmnfpWAdw8W5FyUCZhjvEzPts.png)
    ## Credits and Resources // Créditos y Recursos
    Cover page created in [**Canva**](www.canva.com)
    Translated by [**DeepL**](https://www.deepl.com/translator)
    Video and images captured with my **Samsung Galaxy A53 5G**
    Edited in **Wondershare Filmora 13**
    Music by Melodigne M from Pixabay

    ![diy comunity banner.gif](https://files.peakd.com/file/peakd-hive/edeyglezsosa/23swXhgKCmFYtzonFjqXoVpivudgtk9kiS2eg2BsQT8cyMiD8vYPmGCgoNYZEPx9WVcLD.gif)
    [![banner witness hive diy.gif](https://files.peakd.com/file/peakd-hive/edeyglezsosa/Eo6MRjg61khD6eTqg7XAaKz45E7eNcQ9zJiK83zZfvj55W5Bnp1jszfFc9oFkM395zQ.gif)
    ](https://vote.hive.uno/@hivediy)

    ![Diseño sin título (2).gif](https://files.peakd.com/file/peakd-hive/edeyglezsosa/EoCiB5ktmvqL6mfMpsb6oH8oaTJnnypEYELWswd5zHy9mGT33MDmbdjJmL8neJ33K99.gif)
    4 min
  • Bee's knees: Sweet and sour a great contrast [ENG+ESP]
    https://3speak.tv/watch?v=edeyglezsosa/pynaofkr
    ![Historia de instagram de bebida refrescante de limón .png](https://files.peakd.com/file/peakd-hive/edeyglezsosa/23xKtjBMLYHYRoYPCJFMkD5TGJyRPZ7ffp3N4qpNMoe4eAQ2HDgF33QEXHv1uXp3ruK7e.png)
    Greetings friends of the community. This is my first time posting here and I want to share with you a drink that contrasts perfectly the sweetness of honey with the acidity of lemon. I had never made a drink with these characteristics before because I am not a big fan of the taste of gin, but after doing some research I discovered that it can be enhanced with some ingredients.
    So today I bring you a video tutorial where I will be showing you how I make my own interpretation of the [**Bee's Knees**](https://cocktails.fandom.com/wiki/Bee%27s_Knees). In case you don't know it, the **Bee's Knees** originated during the [U.S. Dry Law](https://es.wikipedia.org/wiki/Estados_Unidos) (1920-1933), when alcoholic beverages were illegal. The name comes from a colloquial expression meaning “the best” [[1]](https://es.wikipedia.org/wiki/Bee%27s_Knees)
    In a literal sense, bee's knees means “bee's knees,” but figuratively it means something like “the eighth wonder,” “the best in the world,” “the ultimate” [[2]](https://context.reverso.net/traduccion/ingles-espanol/bee%27s+knees)
    >! [Spanish Version Here]
    >Saludos amigos de la comunidad. Esta es mi primera vez publicando por acá y quiero compartirles un trago que contrasta perfectamente la dulzura de la miel con la acidez del limón. Nunca antes había elaborado un trago con estas características pues no soy muy fanático del sabor de la ginebra pero al investigar un pco pude descubrir que se puede matizar con algunos ingredientes.
    >
    >Así que el día de hoy les trago un video tutorial donde les estaré mostrando como hago mi propia interpretación del [**Bee's Knees**](https://cocktails.fandom.com/wiki/Bee%27s_Knees). Por si no lo conocen el **Bee's Knees** tuvo su origen durante el marco de la [Ley seca estadounidense](https://es.wikipedia.org/wiki/Estados_Unidos) (1920-1933), cuando las bebidas alcohólicas eran ilegales. El nombre proviene de una expresión coloquial que significa «el mejor» [[1]](https://es.wikipedia.org/wiki/Bee%27s_Knees)
    >
    >En sentido literal, bee's knees quiere decir «rodillas de abeja», pero en sentido figurado quiere decir algo como «la octava maravilla», «lo mejor del mundo», «lo máximo» [[2]](https://context.reverso.net/traduccion/ingles-espanol/bee%27s+knees)
    ## Ingredients// Ingredientes
    English
    Español
    ✔️ Gin
    ✔️ Ginebra
    ✔️ Lemon
    ✔️ Limón
    ✔️ Honey
    ✔️ Miel
    ✔️ Peppermint or Mint
    ✔️ Hierba buena o Menta
    ![20240605_100454.jpg](https://files.peakd.com/file/peakd-hive/edeyglezsosa/23w2gxNajfoBVxKcZaLiSLoebgSUtBnvJKxYNiPixyToQ38CwG2PRyMigHLa9296wQ1ML.jpg)
    ## Tutorial summary // Resumen del tutorial
    1️⃣ To begin with, the lemons should be cut and squeezed until 25 ml of juice is obtained. It is important to strain the juice to prevent seeds and traces of the lemon from getting into the drink.
    >! [Spanish Version Here]
    >1️⃣ *Para empezar, se deben cortar y exprimir los limones hasta obtener 25 ml de jugo. Es importante colar el jugo para evitar que semillas y rastros del limón se integren en el trago.*
    https://images.hive.blog/0x0/https://files.peakd.com/file/peakd-hive/edeyglezsosa/23vsLEmb1vuLpbGcJbKWK6tMBBdQhAR8BmiBBci2Q5k2PcK8fiTfXKeWoFWvVu6QpQ2K5.PNG
    https://images.hive.blog/0x0/https://files.peakd.com/file/peakd-hive/edeyglezsosa/23wgHYAHxxtSaHXYwx9BCbx11rTmSJocnwQbYMPWhUqLqJrB8cpQF8ZZQNqhGbbEGLsjc.PNG
    https://images.hive.blog/0x0/https://files.peakd.com/file/peakd-hive/edeyglezsosa/23vsKyqnZUfJxa3W1Btg3Z2FPHbkAjqNY14WQ1BKjeQXMcppZUETDbtiinzak2tamz6qV.PNG
    2️⃣ Next, in a medium bowl, mix honey and water to obtain a syrup of honey. If the honey is too thick, warm water can be used. Mix until a homogeneous watery substance is obtained.
    >! [Spanish Version Here]
    >2️⃣ *A continuación, en un recipiente mediano mezclamos miel y agua hasta obtener un siro de miel. En caso de que la miel esté muy espesa, se puede emplear agua tibia. Se debe mezclar hasta obtener una sustancia acuosa homogénea.*
    https://images.hive.blog/0x0/https://files.peakd.com/file/peakd-hive/edeyglezsosa/23wgMmakaPHKS2HKuBsQ56FuAUD9nZcFugACJQBMq6HWUCvcztvhJXe92bZSRzZkAnRqi.PNG
    https://images.hive.blog/0x0/https://files.peakd.com/file/peakd-hive/edeyglezsosa/23w2jGPHnv6yWQP938psPZ7m1vT9FAetKZy18hH2keMu5yHTAYBVJZd6exAoGMFn9rK1K.PNG
    https://images.hive.blog/0x0/https://files.peakd.com/file/peakd-hive/edeyglezsosa/23wWvxNsDbzimmbWNkXhG7RdhLpbFLBWGPTNncjkuYfXVRwGRyovjJydBMyNzUGgViBJm.PNG
    https://images.hive.blog/0x0/https://files.peakd.com/file/peakd-hive/edeyglezsosa/23uQnVn44XhpJEo6mHi6dHbDdePBz1Xo7VVYtjo2EtjHuabXLuMubzdX2tDDaUogWi2Ry.PNG
    3️⃣ The alcohol base will be 60 ml of [Beefeater London Dry Gin,](https://www.beefeatergin.com/es-es/gama-beefeater/london-dry-gin/) which is a London Dry Gin whose main ingredients are grain distillates and botanicals with water. [[3]](https://www.beefeatergin.com/es-es/gama-beefeater/london-dry-gin/)
    >! [Spanish Version Here]
    >3️⃣ *Como base alcohólica se utilizarán 60 ml de [Beefeater London Dry Gin,](https://www.beefeatergin.com/es-es/gama-beefeater/london-dry-gin/) el cual es un London Dry Gin cuyos ingredientes principales son destilados de cereales y botánicos con agua. [[3]](https://www.beefeatergin.com/es-es/gama-beefeater/london-dry-gin/)*
    https://images.hive.blog/0x0/https://files.peakd.com/file/peakd-hive/edeyglezsosa/23uQjuycuhPKZgUc8rYBvBVa3LkLoeiAcqC2aEvC7XzUhUiMU9LvLLNjTAL47TFVrfS4r.PNG
    https://images.hive.blog/0x0/https://files.peakd.com/file/peakd-hive/edeyglezsosa/23uQn8brHo7RK7WhNPRi59QjkNNLewjgU79ScKzdTi4M6bFH4y7V9KGU4of5WpKf9nToB.PNG
    4️⃣ Once ready, the three main components of the drinks are mixed in a cocktail shaker with ice. It is important not to put too much ice in the shaker, as there is a risk of watering down the drink.
    >! [Spanish Version Here]
    >4️⃣ *Una vez estén listos, los tres componentes principales de las bebidas se mezclarán en una coctelera junto con hielo. Es importante no introducir mucho hielo en la coctelera, ya que se corre el riesgo de aguar el trago.*
    https://images.hive.blog/0x0/https://files.peakd.com/file/peakd-hive/edeyglezsosa/23wWtxa7uQMBTZgykS7fkiB4f4qXzPnDjs5vpQTxcqYKsLZfyFBi5GWqhgCZ3FEy1gQ88.PNG
    https://images.hive.blog/0x0/https://files.peakd.com/file/peakd-hive/edeyglezsosa/23y8m6KUD8WnaxVjab8v2iSuvUXa1ivUxWvYjsFVnynxWD2iF4n7j4bWB7gMDofXUSPsb.PNG
    https://images.hive.blog/0x0/https://files.peakd.com/file/peakd-hive/edeyglezsosa/23y8oRGg7x57u79D3D5Ri8U1pRyWMLkbBjA7HxgPLo8TH4rJLdNgRECXnv957wF3gT5iV.PNG
    https://images.hive.blog/0x0/https://files.peakd.com/file/peakd-hive/edeyglezsosa/23y8oRGLo9QYGJsa9VuDzdNV6tJsHVd2Cozmf65fYec2zN8vobLVxzzp3drJ3DsCKmZQb.PNG
    https://images.hive.blog/0x0/https://files.peakd.com/file/peakd-hive/edeyglezsosa/23vhwxfKeXD6TxLYZfRCqsoGoRcK2Zy5FbwBBM9t3LLR8cp4hcVsH11sRd8dGX3dgBGPX.PNG
    5️⃣ After mixing for a while, serve the drink in a glass with new ice and garnish with lemon slices and a sprig of mint. It can be consumed using an absorbent directly from the glass.
    >! [Spanish Version Here]
    >5️⃣ *Luego de mezclar por un rato, se sirve el trago en un vaso con hielo nuevo y se adorna con rodajas de limón y una ramita de hierba buena o menta. Puede consumirse utilizando un absorbente directamente del vaso.*
    https://images.hive.blog/0x0/https://files.peakd.com/file/peakd-hive/edeyglezsosa/23uQtFuiEzYdsCYLVJ6xAH9YvJEQ17vYZw9zQo3RWipHXyFfd1NhvhxhxFdrqrg9YFUza.PNG
    https://images.hive.blog/0x0/https://files.peakd.com/file/peakd-hive/edeyglezsosa/23vsNEXXehHjBHv8hmNa63ZN6nanCzrnKLge3rp47A281vJNkj7YvguAtQsvWLGKych1a.PNG
    https://images.hive.blog/0x0/https://files.peakd.com/file/peakd-hive/edeyglezsosa/23wCEJZe6A1ZBQpSwr7UhcMXhK7N4Xra6TjhjQgVao6TU65hvhFNsvt8B5tZgoP4xu7La.PNG
    So much for the tutorial, I hope you enjoyed it. For my part, I was delighted with the mix of flavors and their contrast with the spirit that gin brings.
    >! [Spanish Version Here]
    >Hasta aquí el tutorial, espero que haya sido de su agrado. Por mi parte, quedé encantado con la mezcla de sabores y su contraste con el espíritu que le aporta la ginebra.
    ## Final Result // Resultado Final
    https://images.hive.blog/0x0/https://files.peakd.com/file/peakd-hive/edeyglezsosa/23wgBXmUEdFZjrSZcFk5WbP6FDhGcu3pyfdZg6peipf7XeXMWoEsLvb5fvzUWBaKLnUkc.jpg
    https://images.hive.blog/0x0/https://files.peakd.com/file/peakd-hive/edeyglezsosa/23wC171yihEKbM3wp5P9NTP3acQWg62aEifaMXEwRJHVMCgKtn7sK5eB3fHb1tVkz6c3a.jpg
    https://images.hive.blog/0x0/https://files.peakd.com/file/peakd-hive/edeyglezsosa/23yJCSntnw2AjRERZwD4UgB4myp7FDALWihadNX7fUtQAHhhmZsNkYhD4b8QpNuEhQEpu.jpg
    https://images.hive.blog/0x0/https://files.peakd.com/file/peakd-hive/edeyglezsosa/23wzxsrpDhqToEbSJRdTAL6B3yGWVp8beiT6jt5W51s41WF1NK5DdPiyjsjXLVX7oKVeY.jpg
    https://images.hive.blog/0x0/https://files.peakd.com/file/peakd-hive/edeyglezsosa/23x14nYBd95FZMC3WguJ79kgDU7qc6ei4c8KMVFNpswsduksRhbKRjTnuoXDDKnxJezXW.jpg
    ![Snapshot_46.PNG](https://files.peakd.com/file/peakd-hive/edeyglezsosa/23w2etMQr1qn8hTp5ArgqzGzZHgSD57oV2E6eauZoFgA2m2LwSNir9AKGv1GufnBkDF67.PNG)
    ![2dk2RRM2dZ8gKjXsrozapsD83FxL3Xbyyi5LFttAhrXxr16mCe4arfLHwFmYKkraGFYmHjrWK4gjrnfbYnAEWgiu7haPNvaeCAPaoSvqgV87wSQda4UzpKaAEHTpcJz95U6thCwr6azqBiXRtBeAZZKTgmJcpei7ZhAZjyFv7g.png](https://files.peakd.com/file/peakd-hive/edeyglezsosa/23tRrCsM8uF676cQdqTbrS852E58grkkwobSLvMV8UmdqmnfpWAdw8W5FyUCZhjvEzPts.png)
    `Thank you very much for reading my post. If you liked it, please leave a comment and consider following me so you don't miss my next posts. I'd love to know your opinion and your thoughts about the topic I discussed in this post, see you in the next one! `
    ![2dk2RRM2dZ8gKjXsrozapsD83FxL3Xbyyi5LFttAhrXxr16mCe4arfLHwFmYKkraGFYmHjrWK4gjrnfbYnAEWgiu7haPNvaeCAPaoSvqgV87wSQda4UzpKaAEHTpcJz95U6thCwr6azqBiXRtBeAZZKTgmJcpei7ZhAZjyFv7g.png](https://files.peakd.com/file/peakd-hive/edeyglezsosa/23tRrCsM8uF676cQdqTbrS852E58grkkwobSLvMV8UmdqmnfpWAdw8W5FyUCZhjvEzPts.png)
    ## Credits and Resources // Créditos y Recursos
    Cover page created in [**Canva Pro**](www.canva.com)
    Translated by [**DeepL**](https://www.deepl.com/translator)
    Video and images captured with my **Samsung Galaxy A53**
    Edited in **Wondershare Filmora 13**
    Bibliographical references cited in the text
    Music by Francesco Biondi from Pixabay
    ![amazing drinks banner.png](https://files.peakd.com/file/peakd-hive/edeyglezsosa/23x1UDsHPzpMNiXVttPr3vpGQZ96Wyfr3kyEX9JkPjqUuuFzDgDYWrQWzwD4yxLVMjCcf.png)
    ![Diseño sin título (2).gif](https://files.peakd.com/file/peakd-hive/edeyglezsosa/EoCiB5ktmvqL6mfMpsb6oH8oaTJnnypEYELWswd5zHy9mGT33MDmbdjJmL8neJ33K99.gif)
    3 min
  • DIY: How to make a model house with modern style. [ENG+ESP]
    https://3speak.tv/watch?v=edeyglezsosa/cmznbisx
    ![Blue And Yellow Modern Affordable Roof Repairs Outdoor Banner.png](https://files.peakd.com/file/peakd-hive/edeyglezsosa/48UHJVhp3woZvvAkxiSok26adAK9LiuZce1deamZNgshCQaMnWd76qFVZr7DkwcyW9.jpg)
    Greetings friends of the community. I continue creating cardboard houses and at the same time I continue recycling, doing my bit for the environment. Recently, I brought you a tutorial on how to make a recycled cardboard house using a country design in the best style of a cabin, but today the design I bring you is more urban.
    Today I bring you a tutorial where I will be showing you how to make a model of a cardboard house with a modern style, using recycled materials such as cardboard, white cardboard, egg cartons and clear plastic sheets. I will also take the opportunity to try out a new set of hand cutting tools, which I will be using from now on in my crafts. So, without further ado, let's get started with the tutorial.
    >! [Spanish Version Here]
    >*Saludos amigos de la comunidad. Continúo creando casitas de cartón y a la vez sigo reciclando, aportando mi granito de arena en el cuidado del medio ambiente. Recientemente, les traje un tutorial de cómo hacer una casita de cartón reciclado utilizando un diseño campestre al mejor estilo de una cabaña, pero hoy el diseño que les traigo es más urbano.*
    >
    >*El día de hoy les traigo un tutorial donde les estaré mostrando cómo hacer una maqueta de una casa de cartón con un estilo moderno, empleando materiales reciclados como el cartón, la cartulina, cartones de huevos y láminas de plástico transparente. También aprovecharé para probar un nuevo set de herramientas de corte manuales, las cuales estaré utilizando a partir de ahora en mis manualidades. Así que, sin más dilación, comencemos con el tutorial.*
    ## Materials // Materiales
    English
    Español
    ✔️ Cardboard and white cardboard
    ✔️ Cartón y cartulina blanca
    ✔️ Egg carton
    ✔️ Cartón de huevos
    ✔️ Silicone gun
    ✔️ Pistola de silicona
    ✔️ Cutting or carving tools
    ✔️ Herramientas de corte o tallado
    ✔️ Scissors
    ✔️ Tijeras
    ✔️ Rule and markers
    ✔️ Regla y marcadores
    ✔️ Gray, blue, caramel, white, and green paint
    ✔️ Pintura gris, azul, carmelita, blanca y verde
    ✔️ Clear plastic sheets
    ✔️ Láminas de plástico transparente
    ![20240603_132240.jpg](https://files.peakd.com/file/peakd-hive/edeyglezsosa/23wqgbBEYyQn6DUac5e7wyrQePvxHiTF9vzJ7qbWRhz8eoFSjY4ZUJqBP7mrroguotZkG.jpg)
    1️⃣ The first thing to do is to create the base of the house. To do this, cut out a piece of cardboard that will be the floor and glue a thin ribbon around the edge to make it higher than the rest of the ground (measurements in the video).
    >! [Spanish Version Here]
    >1️⃣ *Lo primero que se debe hacer es crear la base de la casa. Para ello, se debe recortar una pieza de cartón que será el piso y pegarle una cinta fina por el borde para lograr que quede más alto que el resto del terreno. (Medidas en el video)*
    https://images.hive.blog/0x0/https://files.peakd.com/file/peakd-hive/edeyglezsosa/23w2qS81izu7S7QZpEmuepyBcKM2kpVFenLYJ93EqogxpboNjrscFNJS1HBu11fWLMfgK.PNG
    https://images.hive.blog/0x0/https://files.peakd.com/file/peakd-hive/edeyglezsosa/23wgRhyvq1ijuo4W9c7UUGbS29JsW6wwqv1iLfosFrVk9zNfoWZ9dAsapUPajM72t6Udj.PNG
    https://images.hive.blog/0x0/https://files.peakd.com/file/peakd-hive/edeyglezsosa/23wCBw6xMjAvATHiDy3mCdhrZgGciqCHZdG34U8WqZti983MDpM9TypdWJzUigK3jRU8u.PNG
    https://images.hive.blog/0x0/https://files.peakd.com/file/peakd-hive/edeyglezsosa/23x1DKCg2mbyEUigN18tEUjBVqef4gZGkV144vwXUpTCxmAxmKqnoeo5DBnKjQ3pewqs6.PNG
    2️⃣ Once the base of the house is created, each of its exterior and interior walls will be cut out. Each wall will be cut out the corresponding spaces for the doors and windows (measurements in the video).
    >! [Spanish Version Here]
    >2️⃣ *Una vez creada la base de la casa, se recortarán cada una de sus paredes exteriores e interiores. A cada pared se le recortarán los espacios correspondientes para las puertas y ventanas. (Medidas en el video)*
    https://images.hive.blog/0x0/https://files.peakd.com/file/peakd-hive/edeyglezsosa/23wMeauTZK1QjiTnzFjdZ6HnK4pjn5N7bQADmWXRvUQiLLaMQGEhWvFt119Q7Zi2J4Xk9.PNG
    https://images.hive.blog/0x0/https://files.peakd.com/file/peakd-hive/edeyglezsosa/23uQy6SNRbGkunjjcBaJNcgcX52fJ8qVtFuEfyLUu7FW3G5KXm5XMb6RfcqCQTfJHS1hR.PNG
    https://images.hive.blog/0x0/https://files.peakd.com/file/peakd-hive/edeyglezsosa/23wMgtuupGovK7x5LU62wyh7UsqfFas3jDkUMkVznU1tPiwi44YXThRrbrsAZHmZM1Joi.PNG
    https://images.hive.blog/0x0/https://files.peakd.com/file/peakd-hive/edeyglezsosa/23wqnjxaRAeXsGsfcHdxPXhd8r8FmK8kZU5kgrGvhYXTamydY3LYsmwDP6CupAKJDybLk.PNG
    https://images.hive.blog/0x0/https://files.peakd.com/file/peakd-hive/edeyglezsosa/23w2qZMq2gXD8wpzCrWqGkjfCupDcN3tpGVSwST6m2WKTjYjeoGN24NiuxcMykd9miAoB.PNG
    https://images.hive.blog/0x0/https://files.peakd.com/file/peakd-hive/edeyglezsosa/23wX3BpdGpFDaJyU3HWwYLkhxPGYKVsFEMRZw1zAdJAboVbQDUD8Tuxjke8Niad3keDi6.PNG
    3️⃣ Once the spaces for the windows have been cut out, a transparent plastic sheet will be used to cover the windows, as if they were glass windows. White cardboard will be used to make the frames. Once all the pieces are ready, we will proceed to glue each of the walls on the base of the floor of the house.
    >! [Spanish Version Here]
    >3️⃣ *Una vez recortados los espacios para las ventanas, se utilizará una lámina de plástico transparente para cubrir las ventanas, como si fueran ventanas de cristal. Se empleará cartulina blanca para hacer los marcos. Una vez estén todas las piezas listas, se procederá a pegar cada una de las paredes sobre la base del piso de la casa.*
    https://images.hive.blog/0x0/https://files.peakd.com/file/peakd-hive/edeyglezsosa/23ywmC3qZXcw2WxAPy6DhfvzFmeUDP7nMeW7dZqmgqZxMgYi9HCgBWDfwDbPAhPcPuxHe.PNG
    https://images.hive.blog/0x0/https://files.peakd.com/file/peakd-hive/edeyglezsosa/23tSW6UEn8vkFcfPYi5KL27mA2wJF6UW3GdawcsCkP8LkUUezyaXM8ad8mGhQqPneWZKf.PNG
    https://images.hive.blog/0x0/https://files.peakd.com/file/peakd-hive/edeyglezsosa/23vsQKQhMFYMJYn7ToNVHTsvyCdbYJd6F7JNx1nH5LkfBZuB9HSD3S1CADxxApKMbn7fT.PNG
    https://images.hive.blog/0x0/https://files.peakd.com/file/peakd-hive/edeyglezsosa/23w2m3UsPWkHJFc4ubp4T4J7mNZYfxhjKZ17LQ8odW8Zw6K7AaFHfdSz3xz7LxXN84NQ7.PNG
    https://images.hive.blog/0x0/https://files.peakd.com/file/peakd-hive/edeyglezsosa/23tmN66Za8gtXCYpFFDxDAU2p2PTifTXnjUq7H9piwHRg3NT1ojnzwdT9apHVXeVmy71U.PNG
    https://images.hive.blog/0x0/https://files.peakd.com/file/peakd-hive/edeyglezsosa/23xAZyonQkksFGRMpkfwZR2oc58n7h3SR7rpmxUtQio8Q6gHAWwJF5usq9gnxRtaDag3i.PNG
    https://images.hive.blog/0x0/https://files.peakd.com/file/peakd-hive/edeyglezsosa/23uFW44sqJegLHkeUiaYMc3tp3Y5NYZSYTp4TYY828Wm9SpBiRvgiKQPM3SebysyphFfZ.PNG
    4️⃣ Once the main structure of the house is created, a platform will be made for the main entrance. Once glued, it will be decorated with small pieces of egg carton to simulate a floor. A staircase and some steps will also be added to the front of the house, and then the roof will be glued on. (Measurements in the video)
    >! [Spanish Version Here]
    >4️⃣ *Una vez que la estructura principal de la casa esté creada, se confeccionará una plataforma para la entrada principal. Una vez pegada, se adornará con pequeños fragmentos de cartón de huevo para simular un piso. También se agregará una escalera y unos peldaños en la parte frontal de la casa, para luego pegar el techo. (Medidas en el video)*
    https://images.hive.blog/0x0/https://files.peakd.com/file/peakd-hive/edeyglezsosa/23tbwUwrKFTc3b2pab2USnNuvkRAL13YkXhMLZ7ktz1Pkim93qhTqgc2vNE4n9axSxksz.PNG
    https://images.hive.blog/0x0/https://files.peakd.com/file/peakd-hive/edeyglezsosa/23tmFNxriNXuSR71g72khoKjYsWgqkWTzcXfLfDpnDWdg3YT1tdQMqyTiukLo2KFm9hDZ.PNG
    https://images.hive.blog/0x0/https://files.peakd.com/file/peakd-hive/edeyglezsosa/23tSau1gdwchYNNRhTcBkZDRzkDVWGm51dwvaUXNYYm4sRfw8GrywNbMCHtLUG3UyEqQ5.PNG
    https://images.hive.blog/0x0/https://files.peakd.com/file/peakd-hive/edeyglezsosa/23vsSPwu7zfFXaYZTC5EHZ9X8wBBsUWGnZ4u5pWMQ7rhCD2yLhPJ82JxAtduH7WzRtSeh.PNG
    5️⃣ Once everything is properly glued, we proceed to paint everything. Light caramel-colored paint will be applied to the base of the house, green paint around the grounds, blue paint on the walls and gray paint on the roof. If necessary, a coat of white paint will be applied on the door and window frames.
    >! [Spanish Version Here]
    >5️⃣ *Una vez todo esté correctamente pegado, se procede a pintarlo todo. Se aplicará pintura color caramelo claro en la base de la casa, pintura verde en los alrededores del terreno, pintura azul en las paredes y pintura gris en el techo. De ser necesario se aplicara una capa de pintura blanca sobre los marcos de puerta y ventanas.*
    https://images.hive.blog/0x0/https://files.peakd.com/file/peakd-hive/edeyglezsosa/23vsNbK5JDEwap8bhBa7TpoLNPoXYe33ezWeshhCFuasBaRUEKcCFfYrtiDnXAoX4DSmP.PNG
    https://images.hive.blog/0x0/https://files.peakd.com/file/peakd-hive/edeyglezsosa/23w2j7DsQvKyT2eyWwZZXeh74jZiNz392cf9sSJmy2mu6C2EsqCBobX4KqhAqTNQw1WKB.PNG
    https://images.hive.blog/0x0/https://files.peakd.com/file/peakd-hive/edeyglezsosa/23u65K6e982CsbzPewiFqKVDejMTnYqLtdzvDTMMUpxj9ZVDW62b3ubxDX3V1xFNJfrFs.PNG
    https://images.hive.blog/0x0/https://files.peakd.com/file/peakd-hive/edeyglezsosa/23zRyL3vLtGoAv8foPm5RhwyfwioAJjD1KdVM6KYqNJggHW1VDAbPhGC8c82KPTKTBvSc.PNG
    https://images.hive.blog/0x0/https://files.peakd.com/file/peakd-hive/edeyglezsosa/23zRyL3vLtGoAv8foPm5RhwyfwioAJjD1KdVM6KYqNJggHW1VDAbPhGC8c82KPTKTBvSc.PNG
    6️⃣ After painting the entire model, some additional details will be applied, such as marking a design on the door, painting the roof of the bench on the lower part, and sticking some fences around the entire terrain, which will be painted in the same gray color used on the roof.
    >! [Spanish Version Here]
    >6️⃣ *Después de pintar toda la maqueta, se aplicarán algunos detalles adicionales, como marcar un diseño sobre la puerta, pintar el techo del banco por la parte de abajo y pegar unas cercas alrededor de todo el terreno, las cuales irán pintadas del mismo color gris empleado en el techo.*
    https://images.hive.blog/0x0/https://files.peakd.com/file/peakd-hive/edeyglezsosa/23wqiSGnkz7S9ra4jeYybaL2GKP1gjkAH1HSpNDXWMtSF1S5qWctom1S8TzuA5SLg39Zd.PNG
    https://images.hive.blog/0x0/https://files.peakd.com/file/peakd-hive/edeyglezsosa/23wgF8uzo2aF5Gy1exCuuci51fcb1jEEd5t9ZBhgx17ZQoSdVi54qYW1ucmtkbVzrQ1YM.jpg
    https://images.hive.blog/0x0/https://files.peakd.com/file/peakd-hive/edeyglezsosa/23xySmYmgkVuLy4QmP7L4S99eeX8LLNUhyBWkGNyB4apCLWE8NGSuv6zpE29PMGPk4UMz.jpg
    https://images.hive.blog/0x0/https://files.peakd.com/file/peakd-hive/edeyglezsosa/23y8mddJkhT2JWqJfv9cUmdA59eHW4kozA7cYigKYeDG4rvK5fcCR3hahmb2JpDzvWkhY.jpg
    And that would be all for today. I hope you like how the cardboard house turned out. I, for one, am delighted with how the cutting tools work, as they allow me to add more details to things by improving precision. Remember that you can leave any suggestions or doubts in the comments, as I will be happy to answer them.
    >! [Spanish Version Here]
    >*Y pues eso sería todo por hoy. Espero que les guste cómo quedó la casita de cartón. Yo, por mi parte, estoy encantado con el funcionamiento de las herramientas de corte, ya que me permiten agregar más detalles a las cosas al mejorar la precisión. Recuerden que cualquier sugerencia o duda la pueden dejar en los comentarios, puesto que yo estaré encantado de responderles.*
    ## ⚜️ Finished Work // Trabajo Terminado ⚜️
    https://images.hive.blog/0x0/https://files.peakd.com/file/peakd-hive/edeyglezsosa/23w2cSh6q2d8APUFAhRTyddFyahqrd49FsqUKh5Hm3JeLHCzxBv7SpkVvWbSf8f3iz1VZ.jpg
    https://images.hive.blog/0x0/https://files.peakd.com/file/peakd-hive/edeyglezsosa/23xKp3L1X7yat5rcuAqxa2V8Me1heKoakXDf2BaMsbG3q2couc4XfYwYC5TMWDjC9UFQW.jpg
    https://images.hive.blog/0x0/https://files.peakd.com/file/peakd-hive/edeyglezsosa/23tvaHUVwvuMKKvdDYoeMd8JPYrNfa92z2GLQmWAH7x4pbVE5T7VXUPtUjzSUBqZrujnV.jpg
    https://images.hive.blog/0x0/https://files.peakd.com/file/peakd-hive/edeyglezsosa/23wWkeDKg8KaA7rTZsYKj8E8uFJTBoNqZMuHBGkAW3cdCTkxBTaGaVK92qBdEqxLkhRUk.jpg
    ![2dk2RRM2dZ8gKjXsrozapsD83FxL3Xbyyi5LFttAhrXxr16mCe4arfLHwFmYKkraGFYmHjrWK4gjrnfbYnAEWgiu7haPNvaeCAPaoSvqgV87wSQda4UzpKaAEHTpcJz95U6thCwr6azqBiXRtBeAZZKTgmJcpei7ZhAZjyFv7g.png](https://files.peakd.com/file/peakd-hive/edeyglezsosa/23tRrCsM8uF676cQdqTbrS852E58grkkwobSLvMV8UmdqmnfpWAdw8W5FyUCZhjvEzPts.png)
    `Thank you very much for reading my post. If you liked it, please leave a comment and consider following me so you don't miss my next posts. I'd love to know your opinion and your thoughts about the topic I discussed in this post, see you in the next one! `
    ![2dk2RRM2dZ8gKjXsrozapsD83FxL3Xbyyi5LFttAhrXxr16mCe4arfLHwFmYKkraGFYmHjrWK4gjrnfbYnAEWgiu7haPNvaeCAPaoSvqgV87wSQda4UzpKaAEHTpcJz95U6thCwr6azqBiXRtBeAZZKTgmJcpei7ZhAZjyFv7g.png](https://files.peakd.com/file/peakd-hive/edeyglezsosa/23tRrCsM8uF676cQdqTbrS852E58grkkwobSLvMV8UmdqmnfpWAdw8W5FyUCZhjvEzPts.png)
    ## Credits and Resources // Créditos y Recursos
    Cover page created in [**Canva Pro**](www.canva.com)
    Translated by [**DeepL**](https://www.deepl.com/translator)
    Video and images captured with my **Samsung Galaxy A53**
    Edited in **Wondershare Filmora 13**
    Music by Melodigne M from Pixabay
    ![diy comunity banner.gif](https://files.peakd.com/file/peakd-hive/edeyglezsosa/23swXhgKCmFYtzonFjqXoVpivudgtk9kiS2eg2BsQT8cyMiD8vYPmGCgoNYZEPx9WVcLD.gif)
    [![banner witness hive diy.gif](https://files.peakd.com/file/peakd-hive/edeyglezsosa/Eo6MRjg61khD6eTqg7XAaKz45E7eNcQ9zJiK83zZfvj55W5Bnp1jszfFc9oFkM395zQ.gif)
    ](https://vote.hive.uno/@hivediy)
    ![Diseño sin título (2).gif](https://files.peakd.com/file/peakd-hive/edeyglezsosa/EoCiB5ktmvqL6mfMpsb6oH8oaTJnnypEYELWswd5zHy9mGT33MDmbdjJmL8neJ33K99.gif)
    4 min
  • How to make a recycled cardboard house ♻️ [ENG+ESP]
    https://3speak.tv/watch?v=edeyglezsosa/cckkyhnh
    ![Snapshot_70.PNG](https://files.peakd.com/file/peakd-hive/edeyglezsosa/23xerBwvuVRMQbvZ5KaA6ESB1XVfgYR4wipqdoX3xh5nemDsnR9actRV3eFFpRRWaaJio.PNG)
    Hello there, my crafty friends! It's been quite a while since I last posted a little house made with cardboard. I love this kind of crafts, because besides the sentimental meaning attached to the creation, it also brings a sense of well-being knowing that you are making something beautiful and, at the same time, eco-friendly. That is why today I bring you a tutorial where I will show you step by step how to create a colorful little house using recycled materials.
    The little house is small in size, so it can be used as a window decoration or as a toy. It has bright colors to make it more attractive to the eye and was created using different pieces of cardboard. I hope you like it and as always I ask you to leave me in the comments any questions or suggestions you may have.
    >! [Spanish Version Here]
    >*¡Hola! ¿Qué tal, mis amigos artesanos? Ya ha pasado bastante tiempo desde la última vez que publiqué una casita hecha con cartón. Este tipo de manualidades me encantan, ya que además del significado sentimental que se le atribuye a la creación, también trae un sentimiento de bienestar al saber que se está haciendo algo hermoso y, a la vez, ecológico. Es por eso que hoy les traigo un tutorial donde les mostraré paso a paso como crear una colorida casita utilizando materiales reciclados.*
    >
    >*La casita es de un tamaño pequeño, por lo cual puede ser utilizada como adorno de vitrina o como un juguete. Cuenta con colores llamativos para que sea más atractiva a la vista y fue creada utilizando trozos de cartón diferentes. Espero les guste y como siempre les pido que me dejen en los comentarios cualquier duda o sugerencia que tengan.*
    https://images.hive.blog/0x0/https://files.peakd.com/file/peakd-hive/edeyglezsosa/EonifTXkPDSQggLju46gpWR3KxyBqUuDcyv3zZTYYbkpRBDDjH5EyXqcB41xd3gL6s4.jpg
    https://images.hive.blog/0x0/https://files.peakd.com/file/peakd-hive/edeyglezsosa/EoyNyKqCREUutCWujXyt9uu7rvNHMQxmzYusQq3DfDFx3d2VY7JohvKHs8aexhPJGSi.jpg
    ## Materials // Materiales
    English
    Español
    ✔️ Cardboard and paperboard
    ✔️ Cartón y cartulina
    ✔️ Egg carton
    ✔️ Cartón de huevos
    ✔️ Silicone gun
    ✔️ Pistola de silicona
    ✔️ Glue with a flour base
    ✔️ Pegamento con base de harina
    ✔️ Kitchen paper towel
    ✔️ Papel de cocina
    ✔️ Scissors and cutter
    ✔️ Tijeras y cortador
    ✔️ Rule and markers
    ✔️ Regla y marcadores
    ✔️ Lollipop sticks
    ✔️ Palitos de chupa-chus
    ✔️ Acrylic paint
    ✔️ Pintura acrílica
    ✔️ Brushes
    ✔️ Pinceles
    ![20240526_125518.jpg](https://files.peakd.com/file/peakd-hive/edeyglezsosa/23uQrpUb65HjZKEE62PiwCxyLJMXKkJGXfT58PvV14M2twghi9x5yZPWJyY3nWUakmT5s.jpg)
    To begin, mark and cut out the four segments that will make up the walls of the house. Then, glue them together and place the roof on top (see measurements in the video).
    >! [Spanish Version Here]
    >*Para empezar, se deben marcar y recortar los cuatro segmentos que compondrán las paredes de la casa. Luego, se deben pegar y colocar el techo encima. (Ver medidas en el video)*
    https://files.peakd.com/file/peakd-hive/edeyglezsosa/23uFVqX2Y7WZEGX7hUm7CG9mExPfGPjPVbR92DS5w9XhBtJiU586wdYFBz2wuYtDfTULR.PNG
    https://files.peakd.com/file/peakd-hive/edeyglezsosa/23tmKrnswLpBnu74NehjaVJTHtVE7QBZyzmYwLi6bu4U2nguAZ7DjZ8MR4i4T2i6753cU.PNG
    https://files.peakd.com/file/peakd-hive/edeyglezsosa/23tvgEFdzrm8tTFoeyexL3nqv7RGrnhPvx8TMnvWxGr11Rh8E8faptLkJaLAuwiKV33V2.PNG
    https://files.peakd.com/file/peakd-hive/edeyglezsosa/23u5zxzUA1LyE95Su5oKM3bcNBpsT2Aitujwk2gU8imDAPqyLwp1221XV5yZYzKZfneaa.PNG
    Using white construction paper, cut out the shape of a chimney to glue to the side of the house. Small strips of cardboard will be cut out to glue all over the surface of the house, simulating wooden planks and shingles on the roof. Then, with egg carton, cut out and glue small pieces as if they were stones embedded in the chimney.
    >! [Spanish Version Here]
    >*Utilizando cartulina blanca, recorta la forma de una chimenea para pegarla a un costado de la casa. Se recortarán pequeñas tiras de cartulina para pegarlas por toda la superficie de la casa, simulando tablas de madera y tejas en el techo. Luego, con cartón de huevo, recorta y pega pequeños pedazos como si fueran piedras incrustadas en la chimenea.*
    https://files.peakd.com/file/peakd-hive/edeyglezsosa/23vhwVaSWXocD2tfSF8vyZo8M7TEgooyQ8S69M6vMN1fcbCKUUYL4sZx11vZ9wFXn5eFc.PNG
    https://files.peakd.com/file/peakd-hive/edeyglezsosa/23uFTQD2NiSPGPwzmL1ReFdxndD6kCgNpZivRc2Yx9g8noWM1RYjMMPoRyNgi6hN7efcj.PNG
    https://files.peakd.com/file/peakd-hive/edeyglezsosa/23wC7qtDjVx3QJuPbVf4uBvpDarUULdCb3cxLAPfSL3HotfZavYWgwxndFtWTpkvFAztk.PNG
    https://files.peakd.com/file/peakd-hive/edeyglezsosa/23tvefZn61oSdDQ4DnpH9zuv5MkvLzBSqgZJUNL2YwUySVirHYcLpZxZtyXzKRAZ223Va.PNG
    Apply a layer of paper towels and liquid glue to doors and windows. Then glue several sheets of cardboard cut to size on the floor and then cover them with paper towels and flour-based glue.
    >! [Spanish Version Here]
    >*Aplica una capa de papel de cocina y pegamento líquido en puertas y ventanas. Luego pega en el piso varias láminas de cartón cortadas a la medida y a continuación cúbrelas con papel de cocina y pegamento a base de harina.*
    https://files.peakd.com/file/peakd-hive/edeyglezsosa/23xVEdVPX6FJ6SDjUgiXdZr8N5vWbmLszfBP451mUz5jtmm6gRTcGrRsQHMXPhn6CD4cT.PNG
    https://files.peakd.com/file/peakd-hive/edeyglezsosa/23y8mdbDdgK1auj4d4h8gEKGLPx9mEnmm7WRnc6cGzyvoCno1qsQNnCe3WZYfgboNZMGU.PNG
    https://files.peakd.com/file/peakd-hive/edeyglezsosa/23y8onRxbjVQVej7QPLDbELQGT1RY3555aBuoCSCDp64rFLGJH1e5BUANchgvDFpyneaU.PNG
    https://files.peakd.com/file/peakd-hive/edeyglezsosa/23tmG18LyRzWFhRWoMzPNYWx8wjtqwSwVuYaALq4tiTPsygupVSo6aoFGqvoKp8Fx9BTy.PNG
    Place some front supports that you will make with paper or cardboard. On top of the supports, place a piece of cardboard that will serve as the balcony floor. Next, paint the base of the floor and then the chimney. In the case of the chimney, you can choose a single color. I preferred to make it multicolored.
    >! [Spanish Version Here]
    >*Coloca unos soportes frontales que confeccionarás con papel o cartulina. Encima de los soportes, coloca una pieza de cartón que servirá como piso del balcón. Seguidamente, pinta la base del piso y luego la chimenea. En el caso de la chimenea, puedes elegir un solo color. Yo preferí hacerla multicolor.*
    https://files.peakd.com/file/peakd-hive/edeyglezsosa/23tmFZ6BtoTDKzJXf8qwFSHkn43t6SSNKwQqchamofApuqArk7Yscqs9CFsgdsy1PTGap.PNG
    https://files.peakd.com/file/peakd-hive/edeyglezsosa/23w2ieABb3MxGGjBCUQaPMNUfaqf7P5wckNvm8FcgqUUZji9GYW5Ah4cDVQkoRZhuxV2p.PNG
    https://files.peakd.com/file/peakd-hive/edeyglezsosa/23w2kgRZYfG6ZtaLDMUmiRRWoKoqydZKtQ2LBHdPQVywXYCKi9xdZoTvBhZP1fhmHc59C.PNG
    Continue painting, but this time the walls will be blue, the ceiling will be white, and the easel and the frontal bands will be carmelite.
    >! [Spanish Version Here]
    >*Continúa pintando, pero esta vez las paredes serán de azul, el techo de blanco, y el caballete y los cintillos frontales de color carmelita.*
    https://files.peakd.com/file/peakd-hive/edeyglezsosa/23w2jBVYn7c4Yoy28Q1dAkEtisepzrZiTzBt25rosvqX4Zpt7DASGGaNzMLChAMhTwnnc.PNG
    https://files.peakd.com/file/peakd-hive/edeyglezsosa/23xKtLxCkJxQkemnq6dTpS2o161VmnexwXGBsjt5XePmwkhS39FnCphYEiCtYr5eKKBG4.PNG
    https://files.peakd.com/file/peakd-hive/edeyglezsosa/23xKrUaCE5vKFzQtcZFDY6vJJVSDB3B3JNokfmUgCY3PaTtn1KqNr9Tqw9vxeziiQVkus.PNG
    https://files.peakd.com/file/peakd-hive/edeyglezsosa/242Y3YihJvhaDSikXWmm8t3D2eDWj83s72FPu7D5CRyKh2VqYVxZQ3djPEJFryV7zMTPZ.PNG
    https://files.peakd.com/file/peakd-hive/edeyglezsosa/23w2h7cNM8mKaXLVRKmK8MXYfSm53o6HdXBMZdKvn4WkY5tzaTPyATQpKviwtM2nnXKfu.PNG
    The only thing left to do is to place the window and door frames using white cardboard. The front floors should also be painted brown and, finally, the balcony railing should be placed using small pieces of popsicle sticks.
    >! [Spanish Version Here]
    >*Ya solo queda colocar el marco de las ventanas y puertas utilizando cartulina blanca. También se deben pintar los pisos delanteros de color marrón y, para finalizar, colocar la baranda del balcón usando pequeños trozos de palitos de paleta.*
    https://files.peakd.com/file/peakd-hive/edeyglezsosa/23wqkJ9yVjAbgQfggdrsNZQTiZ1g6ip8ARGxzxTpMdGAF6HnKZBAiqLecN3mMsAufTp7A.PNG
    https://files.peakd.com/file/peakd-hive/edeyglezsosa/23yd3v3oZAbDYt2UkNd5zXmsDbhoPCf62cHLotvyAmpP4yjjcJawdWVNhvzbNoCLFvnhv.PNG
    https://files.peakd.com/file/peakd-hive/edeyglezsosa/23u6576k2rzTwwGaHZdRCYGX9BqwL716vuqs4hnuog65qvNEAczRw4844abeUrSbLPAxB.PNG
    ## ⚜️ Finished Work // Trabajo Terminado ⚜️
    https://images.hive.blog/0x0/https://files.peakd.com/file/peakd-hive/edeyglezsosa/EoGxRQ2nGoozrHWPU3T314reo4aincsfx2HvSq2A9VQMrMz6xSW2Fa8XFrpvzEkfHBu.jpg
    https://images.hive.blog/0x0/https://files.peakd.com/file/peakd-hive/edeyglezsosa/EoiUnGD9misM3poHLozopdWTJWQoHoCbGoudNq6Y2CGKTSn2BkoHrEwDg6E4kAU5rhN.jpg
    https://images.hive.blog/0x0/https://files.peakd.com/file/peakd-hive/edeyglezsosa/EopsWC3c9EEzdq4HEd4GxpNPZ1A1CweyuXPCjKZUMQtm2NJn9hpSU1v9rL2V8rf7wc3.jpg
    https://images.hive.blog/0x0/https://files.peakd.com/file/peakd-hive/edeyglezsosa/EoChBSk1QXfb3DJMzG2chPxEaYJisvoBSsuS73JykfRt8turESCD61GCFmf7U5Lbr7r.jpg
    https://images.hive.blog/0x0/https://files.peakd.com/file/peakd-hive/edeyglezsosa/EoGwsqCUD2YRmXvaWFVmLbW4QtHcxdYVgoDAKQzNsYwBqghfFEBfDcKd3NKWuj53skZ.jpg
    ![2dk2RRM2dZ8gKjXsrozapsD83FxL3Xbyyi5LFttAhrXxr16mCe4arfLHwFmYKkraGFYmHjrWK4gjrnfbYnAEWgiu7haPNvaeCAPaoSvqgV87wSQda4UzpKaAEHTpcJz95U6thCwr6azqBiXRtBeAZZKTgmJcpei7ZhAZjyFv7g.png](https://files.peakd.com/file/peakd-hive/edeyglezsosa/23tRrCsM8uF676cQdqTbrS852E58grkkwobSLvMV8UmdqmnfpWAdw8W5FyUCZhjvEzPts.png)
    `Thank you very much for reading my post. If you liked it, please leave a comment and consider following me so you don't miss my next posts. I'd love to know your opinion and your thoughts about the topic I discussed in this post, see you in the next one! `
    ![2dk2RRM2dZ8gKjXsrozapsD83FxL3Xbyyi5LFttAhrXxr16mCe4arfLHwFmYKkraGFYmHjrWK4gjrnfbYnAEWgiu7haPNvaeCAPaoSvqgV87wSQda4UzpKaAEHTpcJz95U6thCwr6azqBiXRtBeAZZKTgmJcpei7ZhAZjyFv7g.png](https://files.peakd.com/file/peakd-hive/edeyglezsosa/23tRrCsM8uF676cQdqTbrS852E58grkkwobSLvMV8UmdqmnfpWAdw8W5FyUCZhjvEzPts.png)
    ## Credits and Resources // Créditos y Recursos
    Cover page created in [**Canva Pro**](www.canva.com)
    Translated by [**DeepL**](https://www.deepl.com/translator)
    Video and images captured with my **Samsung Galaxy A53**
    Edited in **Wondershare Filmora 13**
    Music by u_oyayh5ybip from Pixabay
    ![diy comunity banner.gif](https://files.peakd.com/file/peakd-hive/edeyglezsosa/23swXhgKCmFYtzonFjqXoVpivudgtk9kiS2eg2BsQT8cyMiD8vYPmGCgoNYZEPx9WVcLD.gif)
    [![banner witness hive diy.gif](https://files.peakd.com/file/peakd-hive/edeyglezsosa/Eo6MRjg61khD6eTqg7XAaKz45E7eNcQ9zJiK83zZfvj55W5Bnp1jszfFc9oFkM395zQ.gif)
    ](https://vote.hive.uno/@hivediy)
    ![Diseño sin título (2).gif](https://files.peakd.com/file/peakd-hive/edeyglezsosa/EoCiB5ktmvqL6mfMpsb6oH8oaTJnnypEYELWswd5zHy9mGT33MDmbdjJmL8neJ33K99.gif)
    4 min
  • How to make a circular wall decoration using recycled cardboard and pistachio shells [ENG+ESP]
    https://3speak.tv/watch?v=edeyglezsosa/uwwocrzy
    ![Snapshot.PNG](https://files.peakd.com/file/peakd-hive/edeyglezsosa/23xAVWT74YMNDg7MTDHnKTPkKrJ7Va1b26twEFKFxUZXPDLPdJeffyAeMkMojLYFWrgR2.PNG)
    Greetings friends who love art and crafts. A few days ago I embarked on an odyssey that consists of saturating my mom with ornaments for her house. With that goal in mind, I created the piece that I show you. Today I bring you a video tutorial where I will show you step by step how to make a circular ornament to decorate a wall.
    The ornament in question consists of a cardboard ring decorated in such a way that it resembles a concrete circle with embedded stones. A floral arrangement made from pistachio shells was placed on top and positioned in such a way that it looks like a crescent moon.
    >! [Spanish Version Here]
    >*Saludos amigos amantes del arte y las manualidades. Desde hace unos días me embarqué en una odisea que consiste en saturar a mi mamá con adornos para su casa. Con ese objetivo en mente, creé la pieza que les muestro. Hoy les traigo un video tutorial donde les mostraré el paso a paso de cómo confeccionar un adorno de forma circular para decorar una pared.*
    >
    >*El adorno en cuestión está formado por un anillo de cartón adornado de forma tal que se asemeja a un círculo de concreto con piedras incrustadas. Encima se colocó un arreglo floral elaborado a partir de cáscaras de pistacho y ubicado de forma tal que parezca una media luna.*
    ## Materials // Materiales
    English
    Español
    ✔️ Recycled cardboard
    ✔️ Cartón reciclado
    ✔️ Pistachio shells
    ✔️ Cáscaras de pistacho
    ✔️ Egg carton
    ✔️ Cartón de huevos
    ✔️ Adhesive with flour base
    ✔️ Pegamento con base de harina
    ✔️ Kitchen paper
    ✔️ Papel de cocina
    ✔️ Silicone gun
    ✔️ Pistola de silicona
    ✔️ Floral ribbon
    ✔️ Cinta floral
    ✔️ Cutter
    ✔️ Cortador y compás
    ✔️ Wire
    ✔️ Alambre
    ✔️ Ruler and markers
    ✔️ Regla y marcadores
    ✔️ White, red, and yellow paint
    ✔️ Pintura blanca, roja y amarilla
    ✔️ Brushes
    ✔️ Pinceles
    ![20240522_201432.jpg](https://files.peakd.com/file/peakd-hive/edeyglezsosa/EogMmfSDcz9xkZS5KUwtFC4uNuVmYVK4oDvh6Z8UAvxRFpfbYvQu46cN8NT58rGigXw.jpg)
    To begin, mark and cut two cardboard circles with a diameter of 25 cm and a width of 4 cm between the outer and inner edge. These circles should be glued one on top of the other and then completely covered using kitchen paper and flour-based glue.
    >! [Spanish Version Here]
    >
    >Para empezar, se deben marcar y cortar dos círculos de cartón con un diámetro de 25 cm y un ancho de 4 cm entre el borde exterior e interior. Dichos círculos se deben pegar uno encima del otro y luego se cubrirán completamente utilizando papel de cocina y pegamento con base de harina.
    https://files.peakd.com/file/peakd-hive/edeyglezsosa/23uFY9v74NVmc8RdPTamNh8YewYWsQTqHLCz5FFQEgdHd7QJFwd9zRx5BMKTMdXAk7Cmb.PNG
    https://files.peakd.com/file/peakd-hive/edeyglezsosa/23tbyLt5jmnr5gqscvWeSxyEqvbmRoucmNh47RyA6SQAHS3LVCcVv5sJNHDFDGGqoERau.PNG
    Once dry, apply a uniform coat of white paint covering both sides of the ring and the edges. Let it dry and then glue small fragments of egg carton on one side to simulate stones embedded in the concrete.
    >! [Spanish Version Here]
    >Una vez seco, se aplicará una capa uniforme de pintura blanca cubriendo ambas caras del anillo y los bordes. Se deja secar y a continuación se pega en una de las caras pequeños fragmentos de cartón de huevo que simularán ser piedras incrustadas en el concreto.
    https://files.peakd.com/file/peakd-hive/edeyglezsosa/23vhyvnZ21Pfq4M7xAk8Y9g8gF5VVXrZqLux7J3eGHZwFpNZ1bUWeZ7NFVJEjaXY3mF5a.PNG
    https://files.peakd.com/file/peakd-hive/edeyglezsosa/23tmHzKxEc5oQUbsw5CCXpEAFFFsq8TjZoydAErx5rdTwCRwAoV83frKevu83uqnc4rtk.PNG
    For the leaves, it will be necessary to wrap floral tape around a wire and glue some pistachio shells on each side. In the case of the flowers, we will join two pistachio nuts in the shape of a button and around these we will glue layer after layer of pistachio shells.
    >! [Spanish Version Here]
    >Para las hojas, será necesario envolver cinta floral alrededor de un alambre e ir pegando por cada lado algunas cáscaras de pistachos. En el caso de las flores, uniremos dos pistachos en forma de botón y alrededor de estos iremos pegando capa tras capa de cáscaras de pistacho.
    https://files.peakd.com/file/peakd-hive/edeyglezsosa/23vhyMe92gWDJmje7QuWwW4irds15bcvmAPXANGddpsKuB4ZkNzDx2gcgSmPbqL3ZSC57.PNG
    https://files.peakd.com/file/peakd-hive/edeyglezsosa/23w2qC2zVZCdFLrptCfarDKjg2BCxVxzDi2MsmDzxSz8Hd4xAeN6SL6nTWnsSFBS5edqU.PNG
    Once the 5 leaves are ready, they should be painted green on both sides. In the case of the flowers, 5 should be made and 2 should be painted yellow and 3 red. In addition, 5 flower buds will also be created, which will be 3 red and 2 yellow and red.
    >! [Spanish Version Here]
    >Una vez estén listas las 5 hojas, se deben pintar de verde por ambos lados. En el caso de las flores, se deben confeccionar 5 y se pintarán 2 de color amarillo y 3 de color rojo. Adicionalmente, se crearán también 5 botones de flores, lo cuales serán 3 rojos y 2 amarillos y rojo.
    https://files.peakd.com/file/peakd-hive/edeyglezsosa/23wgMm2RahgvbTVFAknku7WH6MziD5bvujGZMphnAiaCMUhZ67txX56MjcReBaCnYCSje.PNG
    https://files.peakd.com/file/peakd-hive/edeyglezsosa/23xAXq1MVGVBtx9nmTvZwFSJuhrJwmjoQSUvkbWmzSDNYd4b5u4jkJCnhxQNKxXSCsMGH.PNG
    https://files.peakd.com/file/peakd-hive/edeyglezsosa/23wqkAwhGLqjsXwcDtALkvKC1CkyxKhBHVvB4n6G7NswAfaxBDvfKz8m64qUsuF3FEqX5.PNG
    Now all that remains is to place the different parts on the stone ring. First will be the leaves, which will be placed in a crescent shape. Next, the flowers should be placed interspersed with their colors and placed in such a way that they cover the joints of the lower parts of the leaves. Finally, the buds are placed, of which the larger ones will be at the ends of the long leaves and the smaller ones between the other flowers.
    >! [Spanish Version Here]
    >Ya solo queda colocar las distintas partes sobre el anillo de piedra. Primero serán las hojas, las cuales irán colocadas en forma de media luna. Seguidamente se deben colocar las flores intercalando sus colores y ubicadas de tal forma que cubran las uniones de las partes inferiores de las hojas. Al final se colocan los botones, de los cuales los más grandes irán en los extremos de las hojas largas y los más pequeños entre las demás flores.
    https://files.peakd.com/file/peakd-hive/edeyglezsosa/23vhwn6ZiAnQtR5Ukpr4yeVbmdjYxsb5HY4DW9CGQuKpwA4mPEkv8bsnNrUhdiXWA9gbM.PNG
    https://files.peakd.com/file/peakd-hive/edeyglezsosa/23uQrRrMAcBXFrVAJ3keoDMAjz8WGv1KHAtaMV1CqwgivRtq8DnmmXhtg3UL3M2WgySzv.PNG
    https://files.peakd.com/file/peakd-hive/edeyglezsosa/23vhyWKNfYNXqeTJWR8G261oLfmthPSJgpqP95vCNPzoJMXtL4TgR6cwFHExs8TVpyNre.PNG
    ## ⚜️ Finished Work // Trabajo Terminado ⚜️
    https://images.hive.blog/0x0/https://files.peakd.com/file/peakd-hive/edeyglezsosa/23vhoCzrybsvsEgz3yZ7ccdmjT6FhnkyHdzThYQ8hZNg2MPj2wns4eeKn22xo8fueoRv4.jpg
    https://images.hive.blog/0x0/https://files.peakd.com/file/peakd-hive/edeyglezsosa/23wC1Uet4xo9oqhJ4oUrcq6RMN5w5LNUBCA6qcvFyvdpdm8bfhHHujR4BUvXFbnJJu4pP.jpg
    https://images.hive.blog/0x0/https://files.peakd.com/file/peakd-hive/edeyglezsosa/23xKmtV4xYTDgKdJa2pSdmcos3KZFpDe4zsyxsX9WX6QkCmtXmcR69rMXWFkfp2yzgJBh.jpg
    https://images.hive.blog/0x0/https://files.peakd.com/file/peakd-hive/edeyglezsosa/23xyLY1RuE95hmfHf1Gd3hGpJDXYMS3VQ2q7VfWmkoAtrHYmbX81EhQ3n5adpE1cAiGSS.jpg
    ![2dk2RRM2dZ8gKjXsrozapsD83FxL3Xbyyi5LFttAhrXxr16mCe4arfLHwFmYKkraGFYmHjrWK4gjrnfbYnAEWgiu7haPNvaeCAPaoSvqgV87wSQda4UzpKaAEHTpcJz95U6thCwr6azqBiXRtBeAZZKTgmJcpei7ZhAZjyFv7g.png](https://files.peakd.com/file/peakd-hive/edeyglezsosa/23tRrCsM8uF676cQdqTbrS852E58grkkwobSLvMV8UmdqmnfpWAdw8W5FyUCZhjvEzPts.png)
    `Thank you very much for reading my post. If you liked it, please leave a comment and consider following me so you don't miss my next posts. I'd love to know your opinion and your thoughts about the topic I discussed in this post, see you in the next one! `
    ![2dk2RRM2dZ8gKjXsrozapsD83FxL3Xbyyi5LFttAhrXxr16mCe4arfLHwFmYKkraGFYmHjrWK4gjrnfbYnAEWgiu7haPNvaeCAPaoSvqgV87wSQda4UzpKaAEHTpcJz95U6thCwr6azqBiXRtBeAZZKTgmJcpei7ZhAZjyFv7g.png](https://files.peakd.com/file/peakd-hive/edeyglezsosa/23tRrCsM8uF676cQdqTbrS852E58grkkwobSLvMV8UmdqmnfpWAdw8W5FyUCZhjvEzPts.png)
    ## Credits and Resources // Créditos y Recursos
    Cover page created in [**Canva Pro**](www.canva.com)
    Translated by [**DeepL**](https://www.deepl.com/translator)
    Video and images captured with my **Samsung Galaxy A53**
    Edited in **Wondershare Filmora 13**
    Music by Yurii Semchyshyn from Pixabay
    ![diy comunity banner.gif](https://files.peakd.com/file/peakd-hive/edeyglezsosa/23swXhgKCmFYtzonFjqXoVpivudgtk9kiS2eg2BsQT8cyMiD8vYPmGCgoNYZEPx9WVcLD.gif)
    [![banner witness hive diy.gif](https://files.peakd.com/file/peakd-hive/edeyglezsosa/Eo6MRjg61khD6eTqg7XAaKz45E7eNcQ9zJiK83zZfvj55W5Bnp1jszfFc9oFkM395zQ.gif)
    ](https://vote.hive.uno/@hivediy)
    ![Diseño sin título (2).gif](https://files.peakd.com/file/peakd-hive/edeyglezsosa/EoCiB5ktmvqL6mfMpsb6oH8oaTJnnypEYELWswd5zHy9mGT33MDmbdjJmL8neJ33K99.gif)
    4 min
  • How to make a wall decoration using fomi and recycled cardboard ♻️ [ENG+ESP]
    https://3speak.tv/watch?v=edeyglezsosa/xsznjaau
    ![Snapshot.PNG](https://files.peakd.com/file/peakd-hive/edeyglezsosa/23wr61eXP1crEEPsz4KRz2SzkLEqaQKgoHdrYrh1h9HanVrqwoxtZmw2Yj3XRw5e17FBS.PNG)
    Greetings friends of the Hive DIY community. Today I find myself engaged in a challenge that I imposed on myself, it turns out that last Mother's Day, my mom let me know that no matter how many ornaments I make for her, she will always have a place in the house for them. Faced with such news, I had no choice but to laugh, as I imagined my mom's house as a huge shelf at a craft fair. In the end, I accepted the challenge and today I bring you one of the pieces that is destined to decorate my mom's house.
    In today's tutorial I will be showing you step by step how to make a wall ornament created with recycled cardboard and fomi. To make this ornament it will be necessary to cover a cardboard surface with small rectangles, and then apply a layer of kitchen paper smeared with flour-based glue. After drying, the whole piece will be painted white and the rectangular surfaces will be painted red, as if it were a small brick wall. Next, we will cut out the rest of the pieces in fomi and we will place and glue them on the mini brick wall.
    As always, I ask you to leave any questions or suggestions in the comments section. I will be happy to read and answer them. And don't forget to follow me, remember that very soon I will be back here sharing with you another little piece of my creative world.
    >! [Spanish Version Here]
    >*Saludos amigos y amigas de la comunidad Hive DIY. El día de hoy me encuentro enfrascado en un reto que me impuse a mí mismo, resulta que el pasado Día de las Madres, mi mamá me hizo saber que no importa cuántos adornos le haga, siempre va a tener un lugar en la casa para ellos. Ante semejante noticia, no tuve más opción que reírme, pues me imaginé la casa de mi mamá como una enorme estantería de una feria de artesanía. Al final, acepté el reto y el día de hoy les traigo una de las piezas que tiene como destino adornar la casa de mi mamá.*
    >
    >*En el tutorial de hoy les estaré mostrando paso a paso cómo confeccionar un adorno de pared creado con fomi y cartón reciclado. Para la fabricación de dicho adorno será necesario cubrir una superficie de cartón con pequeños rectángulos, para luego aplicarles una capa de papel de cocina untado de pegamento con base de harina. Luego de secarse, se pintará toda la pieza de blanco y las superficies rectangulares de rojo, como si fuera un pequeño muro de ladrillos. A continuación, recortaremos las demás piezas en fomi y las iremos colocando y pegando sobre el mini muro de ladrillos.*
    >
    >*Como siempre, les pido que cualquier duda o sugerencia la dejen en la sección de comentarios. Estaré encantado de leerlos y responderles. Y no olviden seguirme, recuerden que muy pronto volveré a estar por aquí compartiendo con ustedes otro pedacito de mi mundo creativo.*
    ## Materials // Materiales
    English
    Español
    ✔️ Smooth foam in green, white, black, and yellow
    ✔️ Fomi liso verde, blanco, negro y amarillo
    ✔️ Red glittery foam
    ✔️ Fomi escarchado rojo
    ✔️ Recycled cardboard
    ✔️ Cartón reciclado
    ✔️ Red and white paint
    ✔️ Pintura roja y blanca
    ✔️ Brushes
    ✔️ Pinceles
    ✔️ Silicone gun
    ✔️ Pistola de silicona
    ✔️ Twine
    ✔️ Cordel
    ✔️ Scissors and cutter
    ✔️ Tijeras y cortador
    ✔️ Flour-based glue
    ✔️ Pegamento con base de harina
    ✔️ Kitchen paper
    ✔️ Papel de cocina
    ✔️ Ruler, pen, and marker
    ✔️ Regla, bolígrafo y marcador
    ![20240519_182027.jpg](https://files.peakd.com/file/peakd-hive/edeyglezsosa/23uQpfdyqAi17me8YH3A8Jfoe4RxwJfnQ53XgSohvzRgusHgYbTPjT8wXjKk5xpcDxJUw.jpg)
    ## ⚜️ Finished Work // Trabajo Terminado ⚜️
    https://images.hive.blog/0x0/https://files.peakd.com/file/peakd-hive/edeyglezsosa/23xoymYn5oeWWGA4GbaKQB2JVPaaHQuYuQ4sVZaa9ZLqzfNjACAgPgUmaLaNGGhiQKSoK.jpg
    https://images.hive.blog/0x0/https://files.peakd.com/file/peakd-hive/edeyglezsosa/23xyZGrvUYQXPVj7USttFjtLf3e86Rt2umgkE1wfDsS65SP1dEisLU5fV63pzQz3HQ88x.jpg
    https://images.hive.blog/0x0/https://files.peakd.com/file/peakd-hive/edeyglezsosa/23vsSohNHWmxH17RU2Qzp8uFxyvhcMZ5J5GDYeZLVBMfNErteBYKRMfMU1Eqgp2ojePn5.jpg
    https://images.hive.blog/0x0/https://files.peakd.com/file/peakd-hive/edeyglezsosa/23y8onMVogXpiNJYzuXKzV3z5YEdjL3A4wayoVoLhV8moGvybEwEr69j9G23CRX5NB13H.jpg
    https://images.hive.blog/0x0/https://files.peakd.com/file/peakd-hive/edeyglezsosa/23xp4ho8ckrJCF5cagKs8RZ9ygvNBTjGTDoc16wtSMsnHEsFfnYWuXYryGtaezfFnk71Q.jpg
    ![2dk2RRM2dZ8gKjXsrozapsD83FxL3Xbyyi5LFttAhrXxr16mCe4arfLHwFmYKkraGFYmHjrWK4gjrnfbYnAEWgiu7haPNvaeCAPaoSvqgV87wSQda4UzpKaAEHTpcJz95U6thCwr6azqBiXRtBeAZZKTgmJcpei7ZhAZjyFv7g.png](https://files.peakd.com/file/peakd-hive/edeyglezsosa/23tRrCsM8uF676cQdqTbrS852E58grkkwobSLvMV8UmdqmnfpWAdw8W5FyUCZhjvEzPts.png)
    `Thank you very much for reading my post. If you liked it, please leave a comment and consider following me so you don't miss my next posts. I'd love to know your opinion and your thoughts about the topic I discussed in this post, see you in the next one! `
    ![2dk2RRM2dZ8gKjXsrozapsD83FxL3Xbyyi5LFttAhrXxr16mCe4arfLHwFmYKkraGFYmHjrWK4gjrnfbYnAEWgiu7haPNvaeCAPaoSvqgV87wSQda4UzpKaAEHTpcJz95U6thCwr6azqBiXRtBeAZZKTgmJcpei7ZhAZjyFv7g.png](https://files.peakd.com/file/peakd-hive/edeyglezsosa/23tRrCsM8uF676cQdqTbrS852E58grkkwobSLvMV8UmdqmnfpWAdw8W5FyUCZhjvEzPts.png)
    ## Credits and Resources // Créditos y Recursos
    Cover page created in [**Canva Pro**](www.canva.com)
    Translated by [**DeepL**](https://www.deepl.com/translator)
    Video and images captured with my **Samsung Galaxy A53 5G**
    Edited in **Wondershare Filmora 13**
    Music by Mike Kripak from Pixabay
    ![diy comunity banner.gif](https://files.peakd.com/file/peakd-hive/edeyglezsosa/23swXhgKCmFYtzonFjqXoVpivudgtk9kiS2eg2BsQT8cyMiD8vYPmGCgoNYZEPx9WVcLD.gif)
    [![banner witness hive diy.gif](https://files.peakd.com/file/peakd-hive/edeyglezsosa/Eo6MRjg61khD6eTqg7XAaKz45E7eNcQ9zJiK83zZfvj55W5Bnp1jszfFc9oFkM395zQ.gif)
    ](https://vote.hive.uno/@hivediy)
    ![Diseño sin título (2).gif](https://files.peakd.com/file/peakd-hive/edeyglezsosa/EoCiB5ktmvqL6mfMpsb6oH8oaTJnnypEYELWswd5zHy9mGT33MDmbdjJmL8neJ33K99.gif)
    4 min

About edeyglezsosa 3Speak Podcast

From the publisher's feed

Listen and watch the latest videos from edeyglezsosa. Hosted by 3Speak.tv. The free speech video platform on the HIVE blockchain.